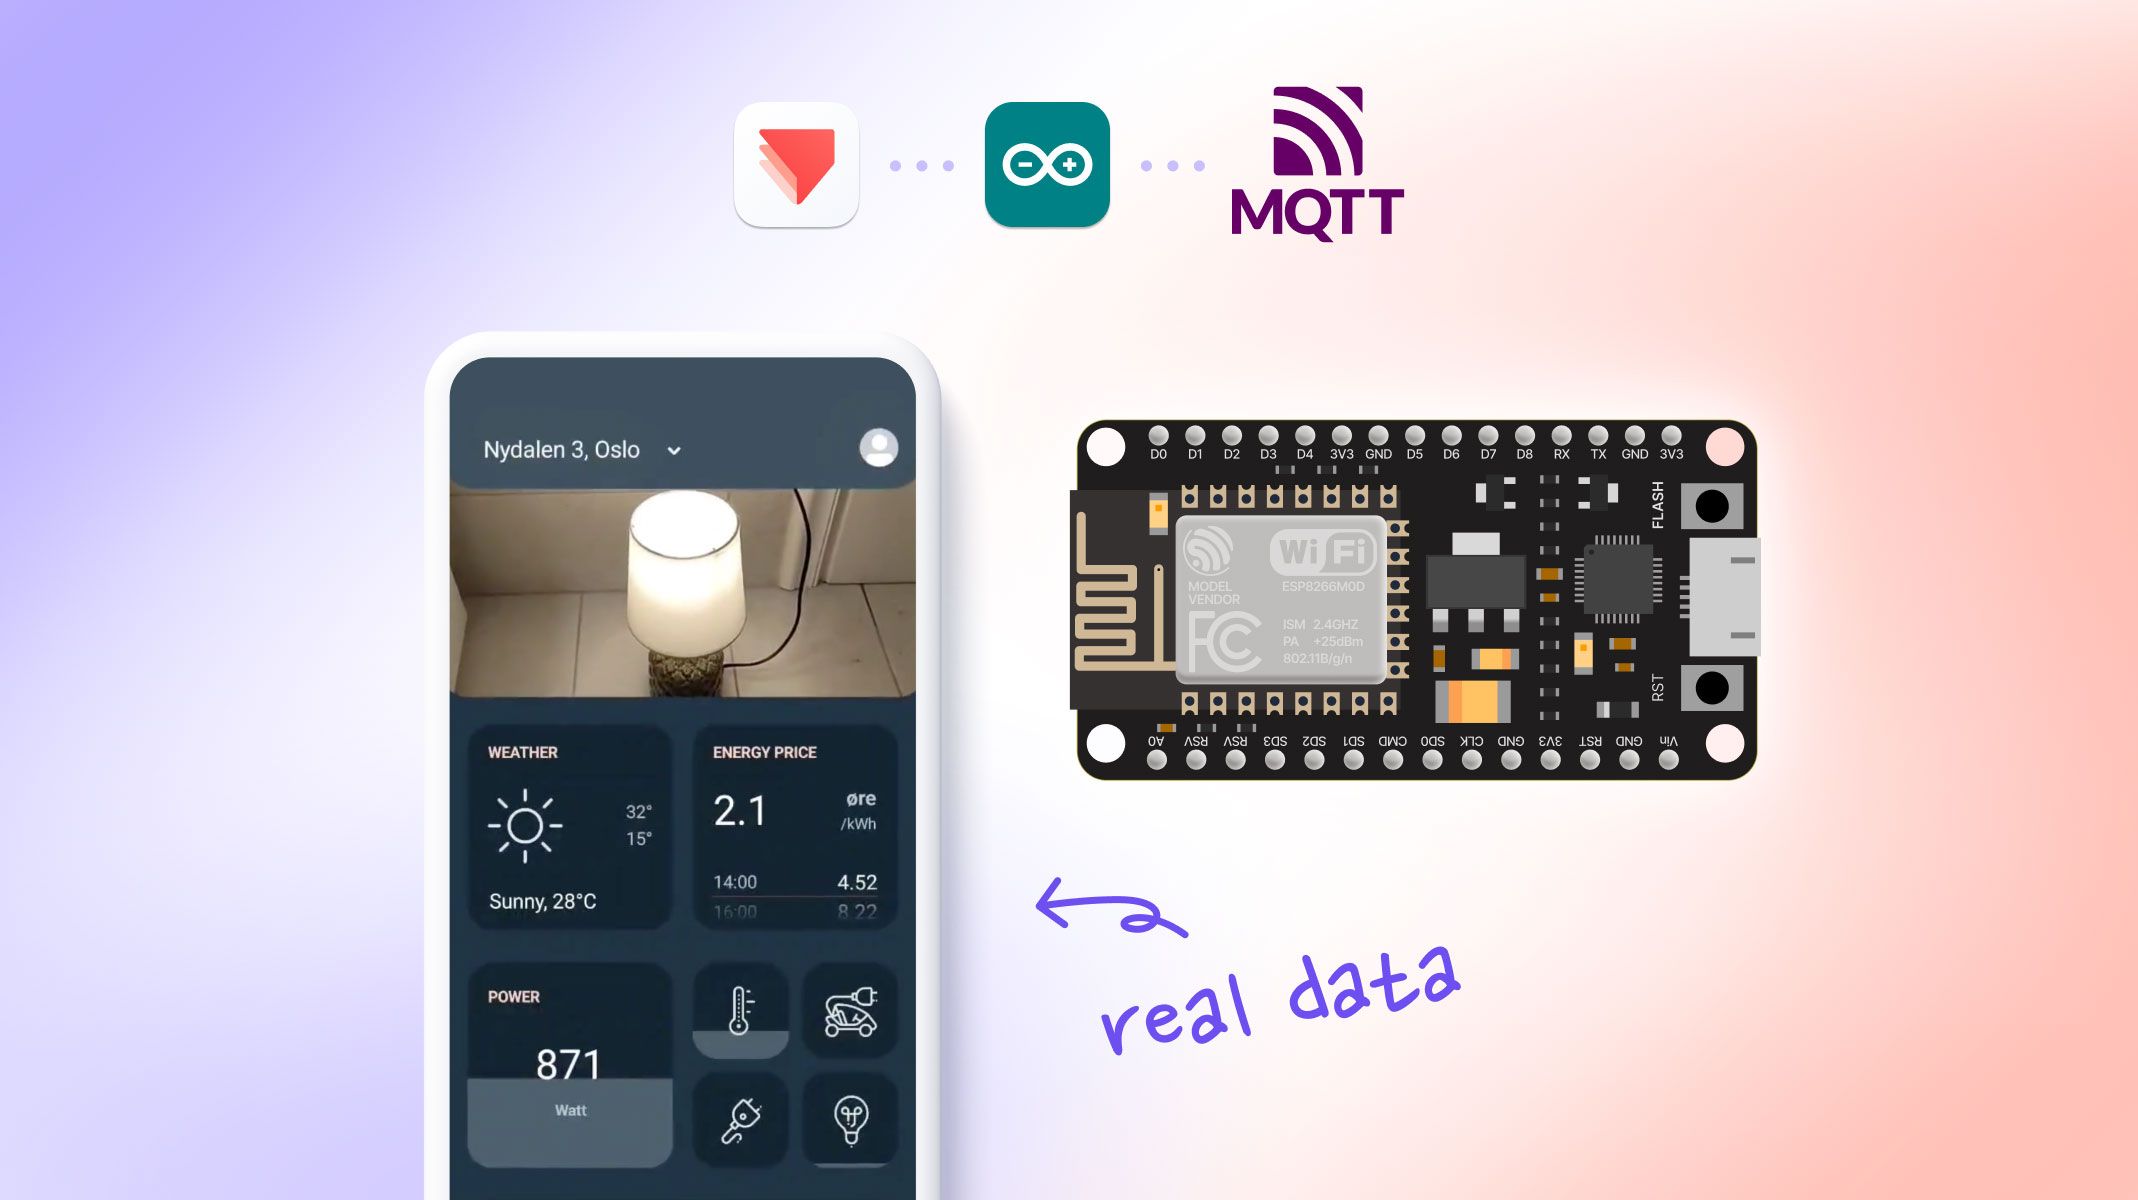
Smart Home Prototyping: Arduino MQTT Bridge
Elevate your prototyping with Arduino as an intermediary bridge.

.jpg?fm=webp)
This advanced prototyping tutorial explores how an Arduino can be used as an intermediary bridge to bring ProtoPie prototypes to life with real data from platforms that run on MQTT.
This solution enables non-enterprise teams to achieve MQTT communication without the need for Socket.io, although in a more cumbersome way until they are ready to scale up to an enterprise plan.
Overview
- What we are building
- What is MQTT?
- Gather your topics and messages
- Creating an Arduino Bridge
- Download files
- Edit the ProtoPie prototype
- Run the prototype with ProtoPie Connect
- Conclusion
- Control smart devices in your home with ProtoPie
What we are building
After following this tutorial, you’ll be able to achieve something like in the video below.
.gif)
Disclaimer
We are using a Futurehome gateway for our example which we understand can be very audience-specific. We are confident that you can replicate this method to any other service that uses open MQTT, like Home Assistant. Reach out to partheniadis.k@gmail.com for further support.
What is MQTT?
MQTT is a common protocol to send and receive messages between a client and a gateway in a json format. Think of it simply as a group chat, where many participants can send and read a topic-related message.
In our example, our gateway is a Futurehome Smarthub II, which uses open MQTT for all smart home messages exchanged. Futurehome users typically use a mobile app to turn on a light in their homes. By tapping on the light, the app publishes a message “state: on” to the relevant topic “bedside light.”
Once the message is published on MQTT, the gateway grabs it and turns on the light. If it is successfully turned on, the gateway publishes an event to the MQTT under the same topic, “bedroom light,” that the “state: on” accompanies by more detailed properties like consumption, e.g., “power: 5 watts”.
The app can retrieve this information because it is subscribed to that specific topic and listens to all its updates.


Follow the video tutorial on how to turn on MQTT API for Futurehome so that you can subscribe and publish under topics. Please refer to the checklist below before you proceed:
- Set up Local API in the Futurehome app
- Set username and password for increased security
- Turn on ThingsPlex in Playground to explore topics and messages
Gather your topics and messages
1. Use the Futurehome app to control your devices and monitor the messages exchanged in ThingsPlex Message stream.

2. Open a text file and paste the messages you want to send from your ProtoPie prototype. For example, turn on the light:
{
  "serv": "out_bin_switch",
  "type": "evt.binary.report",
  "val_t": "bool",
  "val": true,
  "props": null,
  "tags": null,
  "src": "-",
  "ver": "1",
  "uid": "65efafed-4620-451e-87c5-bf64b0c313c7",
  "topic": "pt:j1/mt:evt/rt:dev/rn:zigbee/ad:1/sv:out_bin_switch/ad:1_1"
}
3. Open another text file and paste the events you want to monitor and show in your ProtoPie prototype. For example, consumption of the light (10.5W):
{
  "serv": "sensor_power",
  "type": "evt.sensor.report",
  "val_t": "float",
  "val": 10.5,
  "props": {
    "unit": "W"
  },
  "tags": null,
  "src": "-",
  "ver": "1",
  "uid": "6797ee16-21ab-4a7a-a52c-b4fabf66be53",
  "topic": "pt:j1/mt:evt/rt:dev/rn:zw/ad:1/sv:sensor_power/ad:12_0"
}
Creating an Arduino Bridge
Once our MQTT is accessible and our topics and messages are gathered, we can make our Arduino bridge. The Arduino will essentially forward MQTT messages from MQTT to ProtoPie Connect and from ProtoPie to ProtoPie Connect.

The simplified steps are listed below, but you can find more detailed explanations in the video tutorial and the Arduino code template:
- Get a WiFi or LAN-enabled board. We are using Adafruit Feather. Any ESP8266 will do.
- Include the ESP library: ESP8266WiFi.h
- Include the MQTT pub/sub library: PubSubClient.h
- Include ArduinoJson.h to work with JSON easier
- Create an array of your topics that you will post on to send the commands (as saved in your text files)
- Create an array of your topics that you will subscribe to for receiving the events (as saved in your text files)
- Format & simplify messages in JSON to send to MQTT via ProtoPie Connect
- Simplify & serial print messages received for ProtoPie Connect, e.g., “STATE_LAMP || 1” so the prototype can show them.
String val_type = doc["val_t"];
  if (val_type == "bool"){
    bool val_bool = doc["val"];
    String s = nickname+"||"+val_bool;
    //Format used by ProtoPie Connect is "RECEIVE || VALUE"
    //e.g. Serial.println("ROTATE||90");
    Serial.println(s);
     blink_LED();
  }
Download files
Download the code template & ProtoPie prototype here.
Edit the ProtoPie prototype
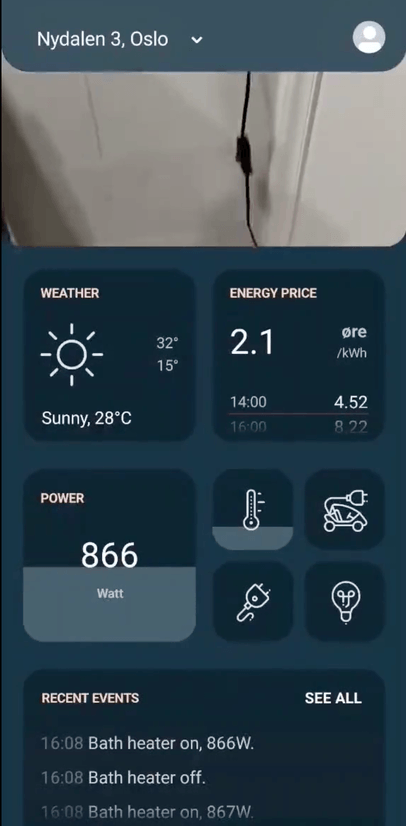
We want our prototype to be able to ‘turn on’ or ‘turn off’ a light and show its power consumption in real time. In addition to that, we will create a timeline of events that will add the last received event on top with a timestamp.
- Setup your variables according to your needs:
- “state_lamp” number to store the received state of the light (0: off, 1 :on)
- “power_lamp” text to store the consumption in Watts. We will convert it to a number inside formulas to make any needed calculations or conversions, e.g., to kW.
- “events_text” text to store our timeline of events.
- Create your tap events to publish new events.

- Send a turn-on command if the light is off
- Send a turn-off command if the light is on
- Receive incoming events from ProtoPie Connect.

- Incoming message is “STATE_LAMP” and stores its contents in the “state_lamp” variable as they come from Arduino.
Run the prototype with ProtoPie Connect
Finally, add your ProtoPie prototype into ProtoPie Connect and run the Arduino plugin on your Arduino port with a baud rate of 115200.
Conclusion
In this advanced prototyping tutorial, we connected our smart home ProtoPie prototype with real data fetched from the Futurehome MQTT broker. This enables us to control smart devices around our home and receive events that we can utilize for fresh, in-app visualizations.
Ultimately, this method will help us prototype innovative interactions between physical and digital goods in more efficient and creative ways. It will also decompress the development team and involve stakeholders in untangling unforeseen complexities early in the design process.
Control smart devices in your home with ProtoPie
Ready to revolutionize your smart home concepts? Dive into ProtoPie and seamlessly integrate your ideas with real-world functionality. Take the next step in smart home innovation
.jpg?fm=webp)
.jpg?fm=webp)
.jpg?fm=webp)