Why Move from Figma to ProtoPie for Advanced Prototyping
Once you reach Figma's limits, it’s time to move on. Build advanced prototypes with custom interactions, input validation, and lightweight Lottie animations in this beginner guide with ProtoPie.

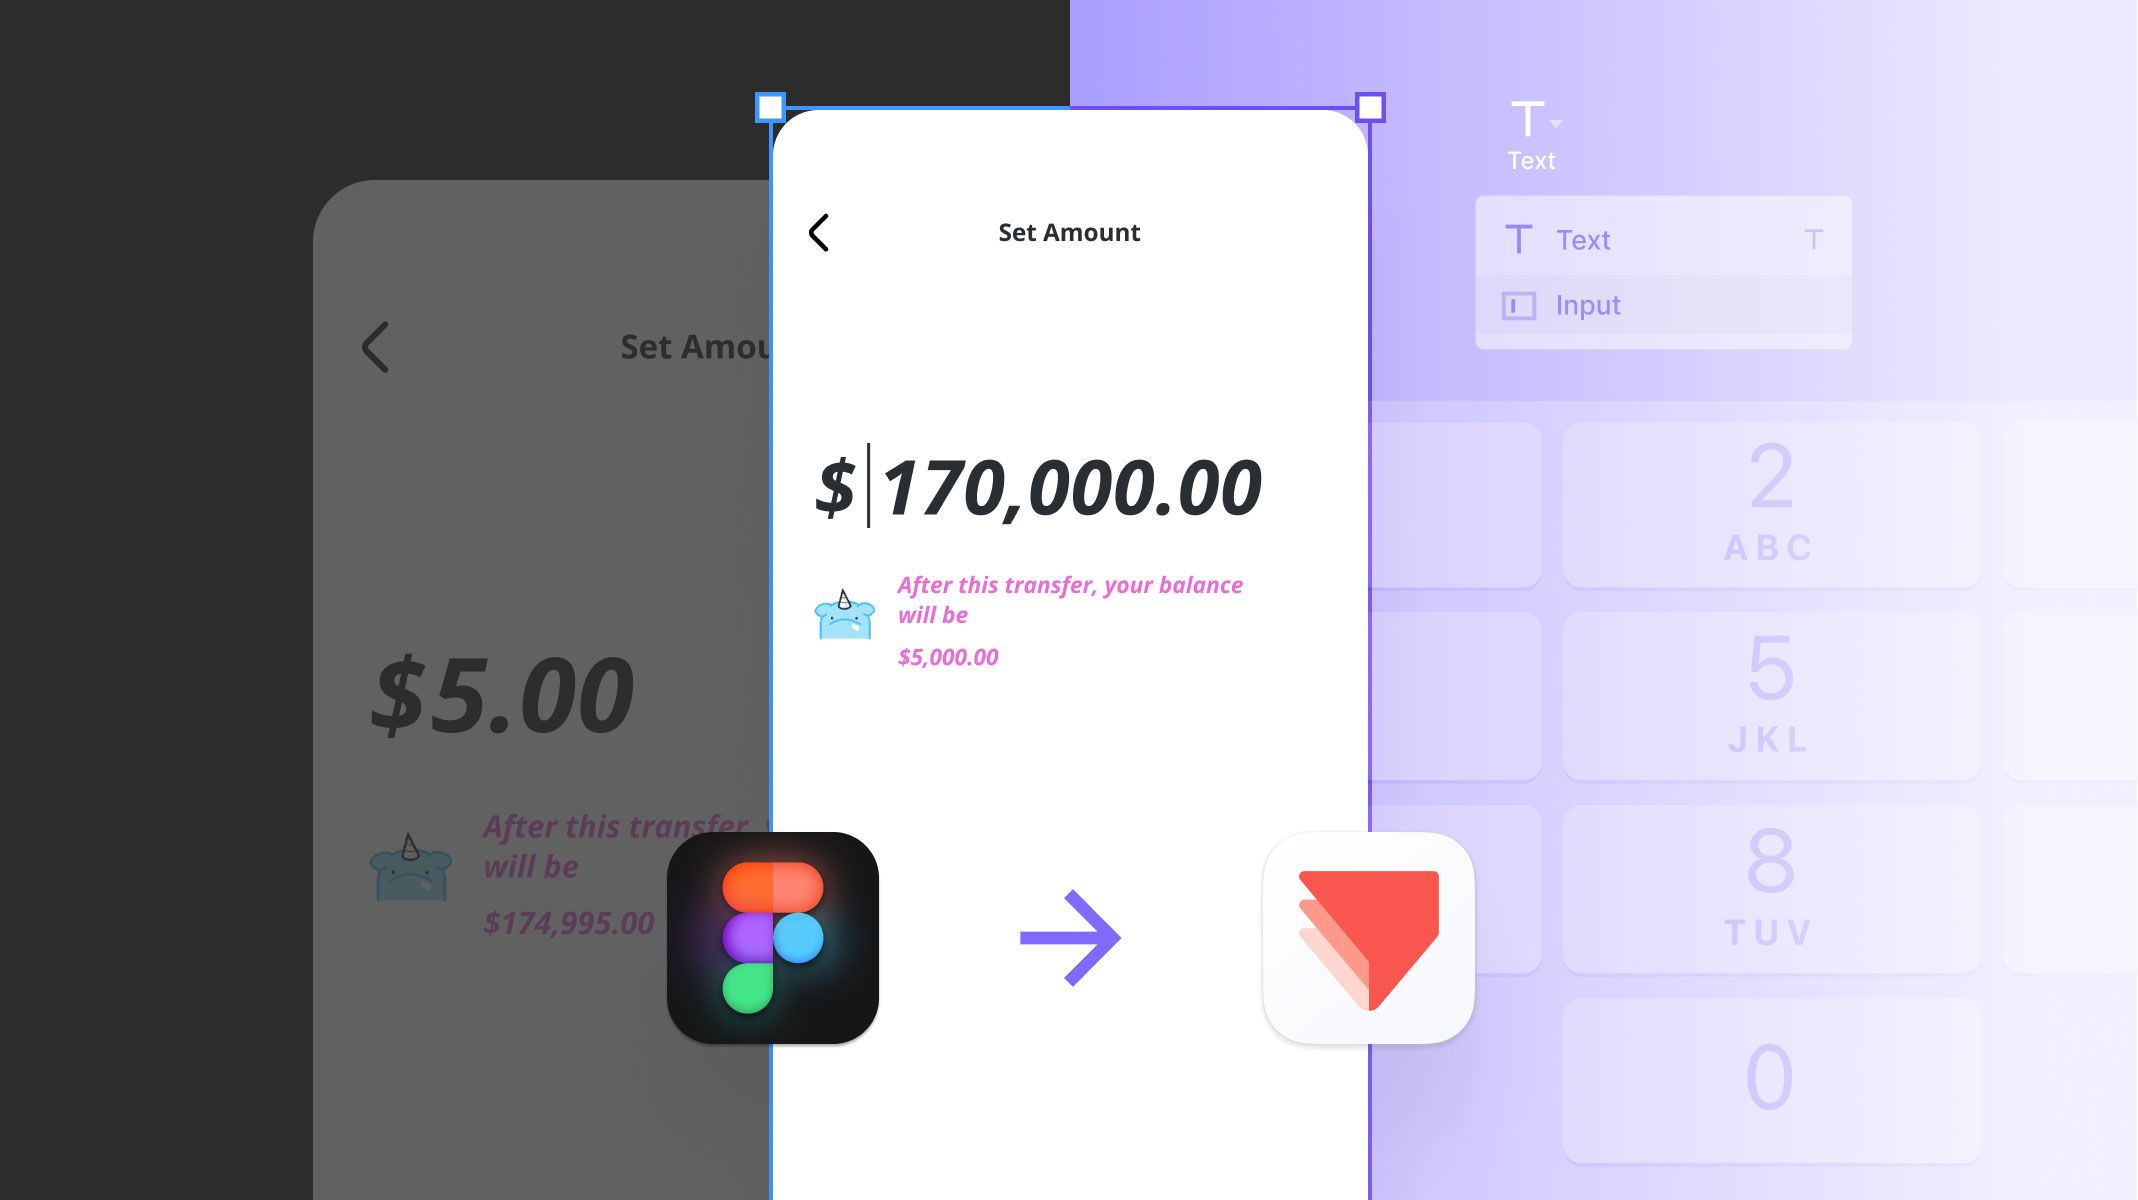
Before diving into ProtoPie, let’s briefly talk about Figma. This tool is great for most of our design needs when designing user interfaces, brainstorming ideas in FigJam, and creating presentations with Figma Slides. Plus, its AI integrations further enhance Figma’s versatility.
However, Figma has limitations. Complex interactions can be tricky, even with its robust UI3 interface and, logic-driven features. Tasks such as real-time validations or multi-step logic, that require simple formulas and minimal setup in ProtoPie, can become cumbersome in Figma. Thus, underscoring the need for dedicated prototyping tools for high-fidelity interactions.
What you’ll learn:
- Figma’s prototyping limits
- ProtoPie for advanced prototyping
- Getting started with ProtoPie
- Creating advanced interactions & adding animations
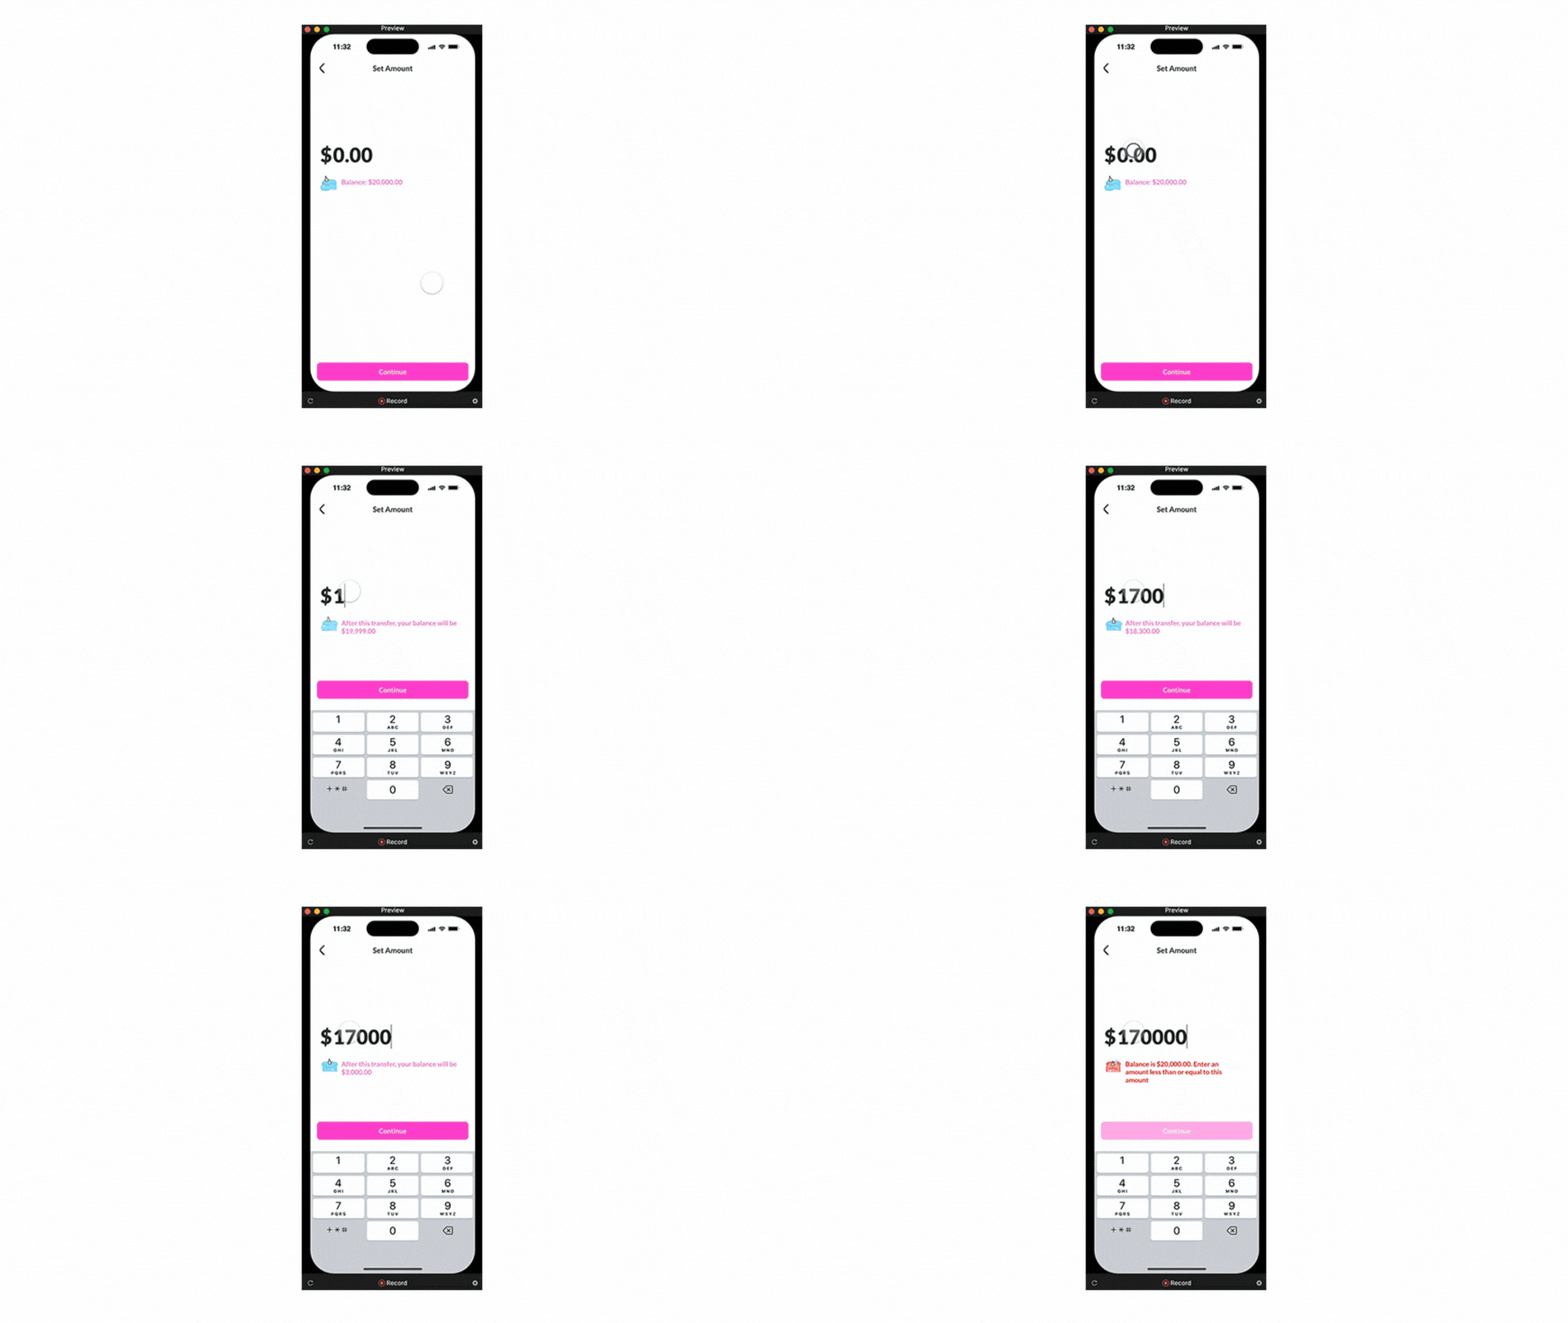
At the end of this tutorial, you will be able to build your own “Money Transfer App” like this from scratch:
.gif)
Figma’s Prototyping Limits
Now, let’s address the areas Figma falls short on — at least for now.
- Real-time validation and feedback limitations
- Extensive variable management
- Native input/keyboard interactions
- Complex customization for general simple output
For example, imagine building a money transfer app where the amount entered must be validated against a user’s account balance. Users must send an amount greater than 0 but equal to or less than the total balance. In Figma, this requires numerous variables:
- 3 number variables (for balance and amounts)
- 2 string variables (for messages)
- 1 color variable (for error messages)
- 2 booleans (for showing/hiding messages)
- Plus additional variables to control UI elements like message length and button opacity

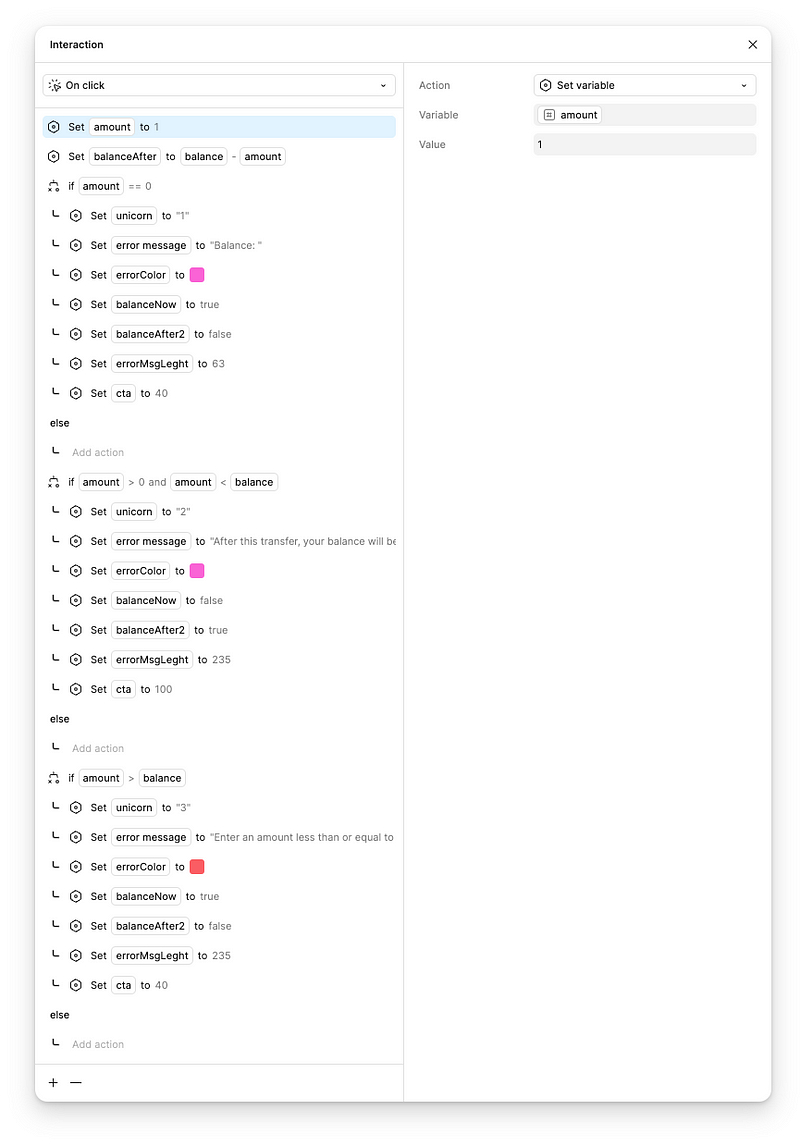
But do note that Figma doesn’t natively support multi-digit input fields or keyboard interactions. You can use numbers and strings, but you can’t type something that goes beyond a single digit. Hence, requiring to create a heavily customized keyboard from scratch with complex interactions that looks like this:
.png)
Now, imagine this crazy validation set on each key. Double it if you need it to work on an actual keyboard.
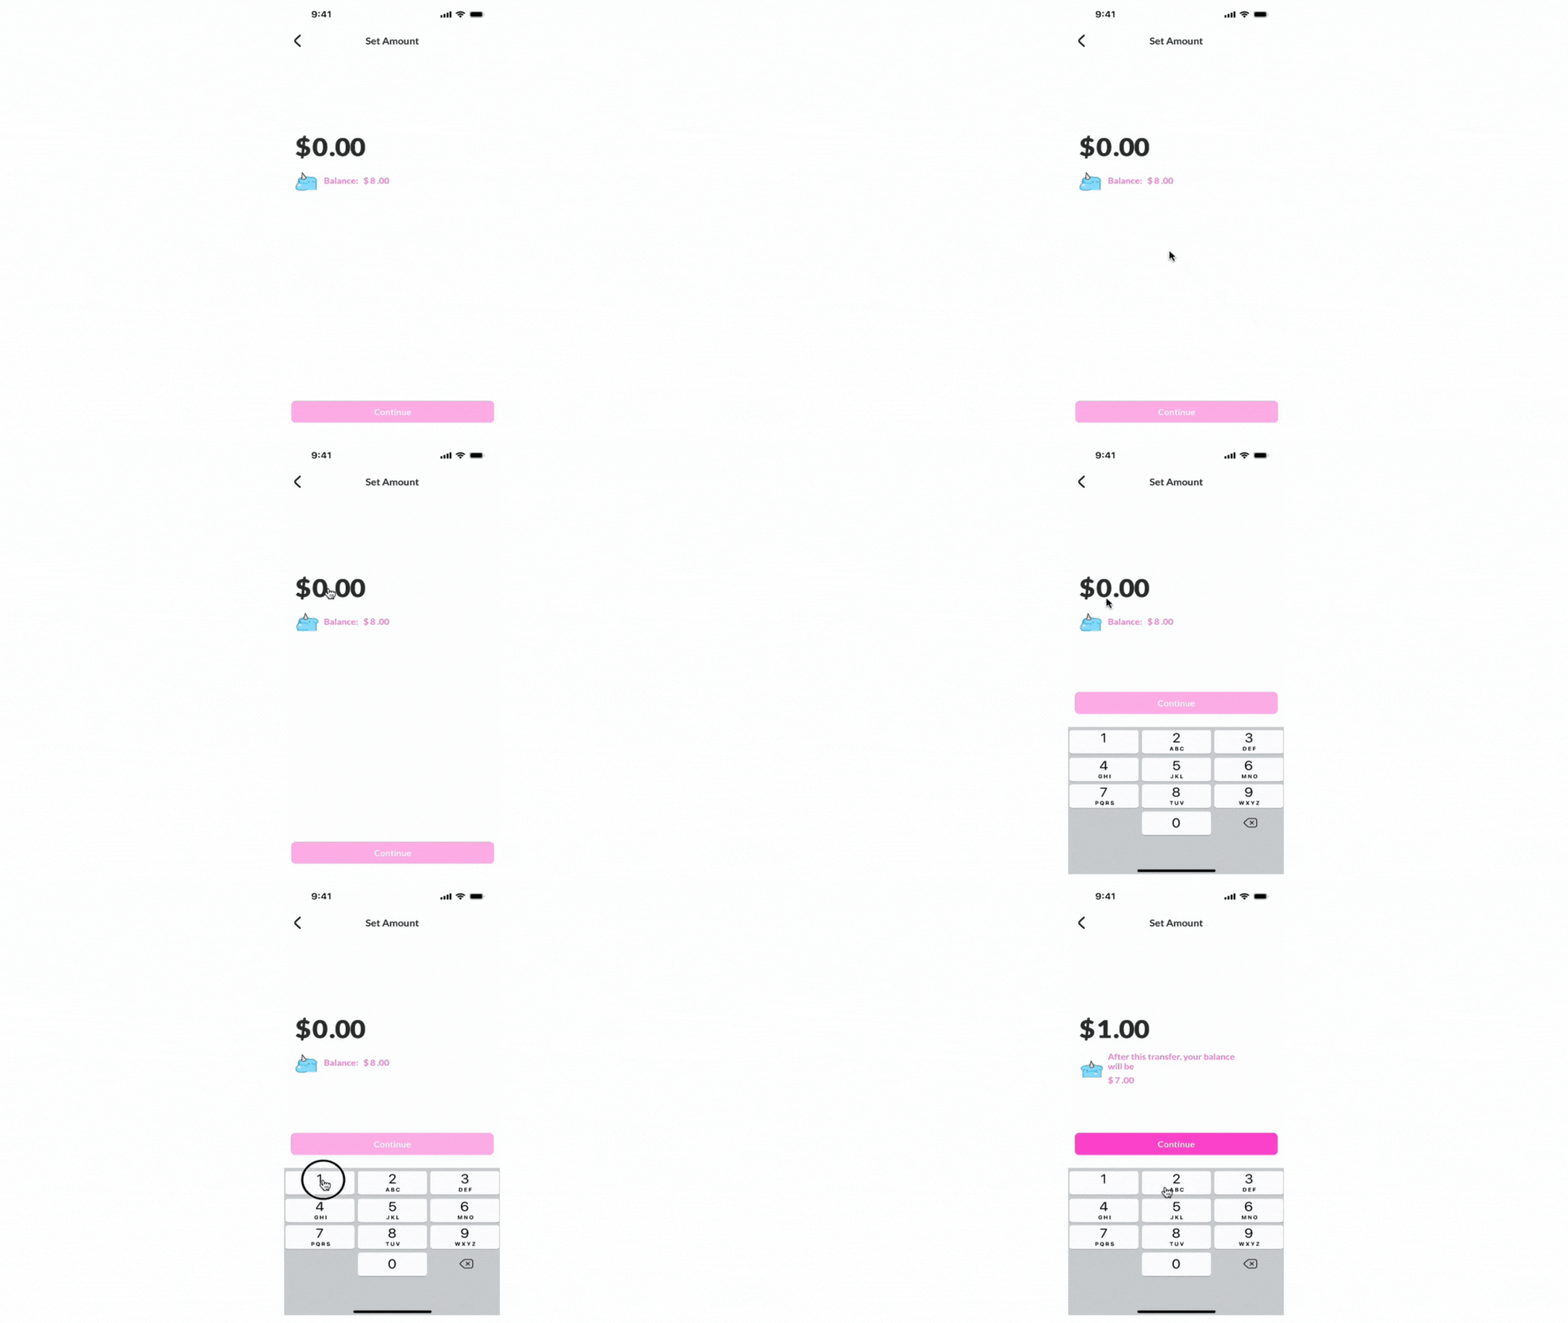
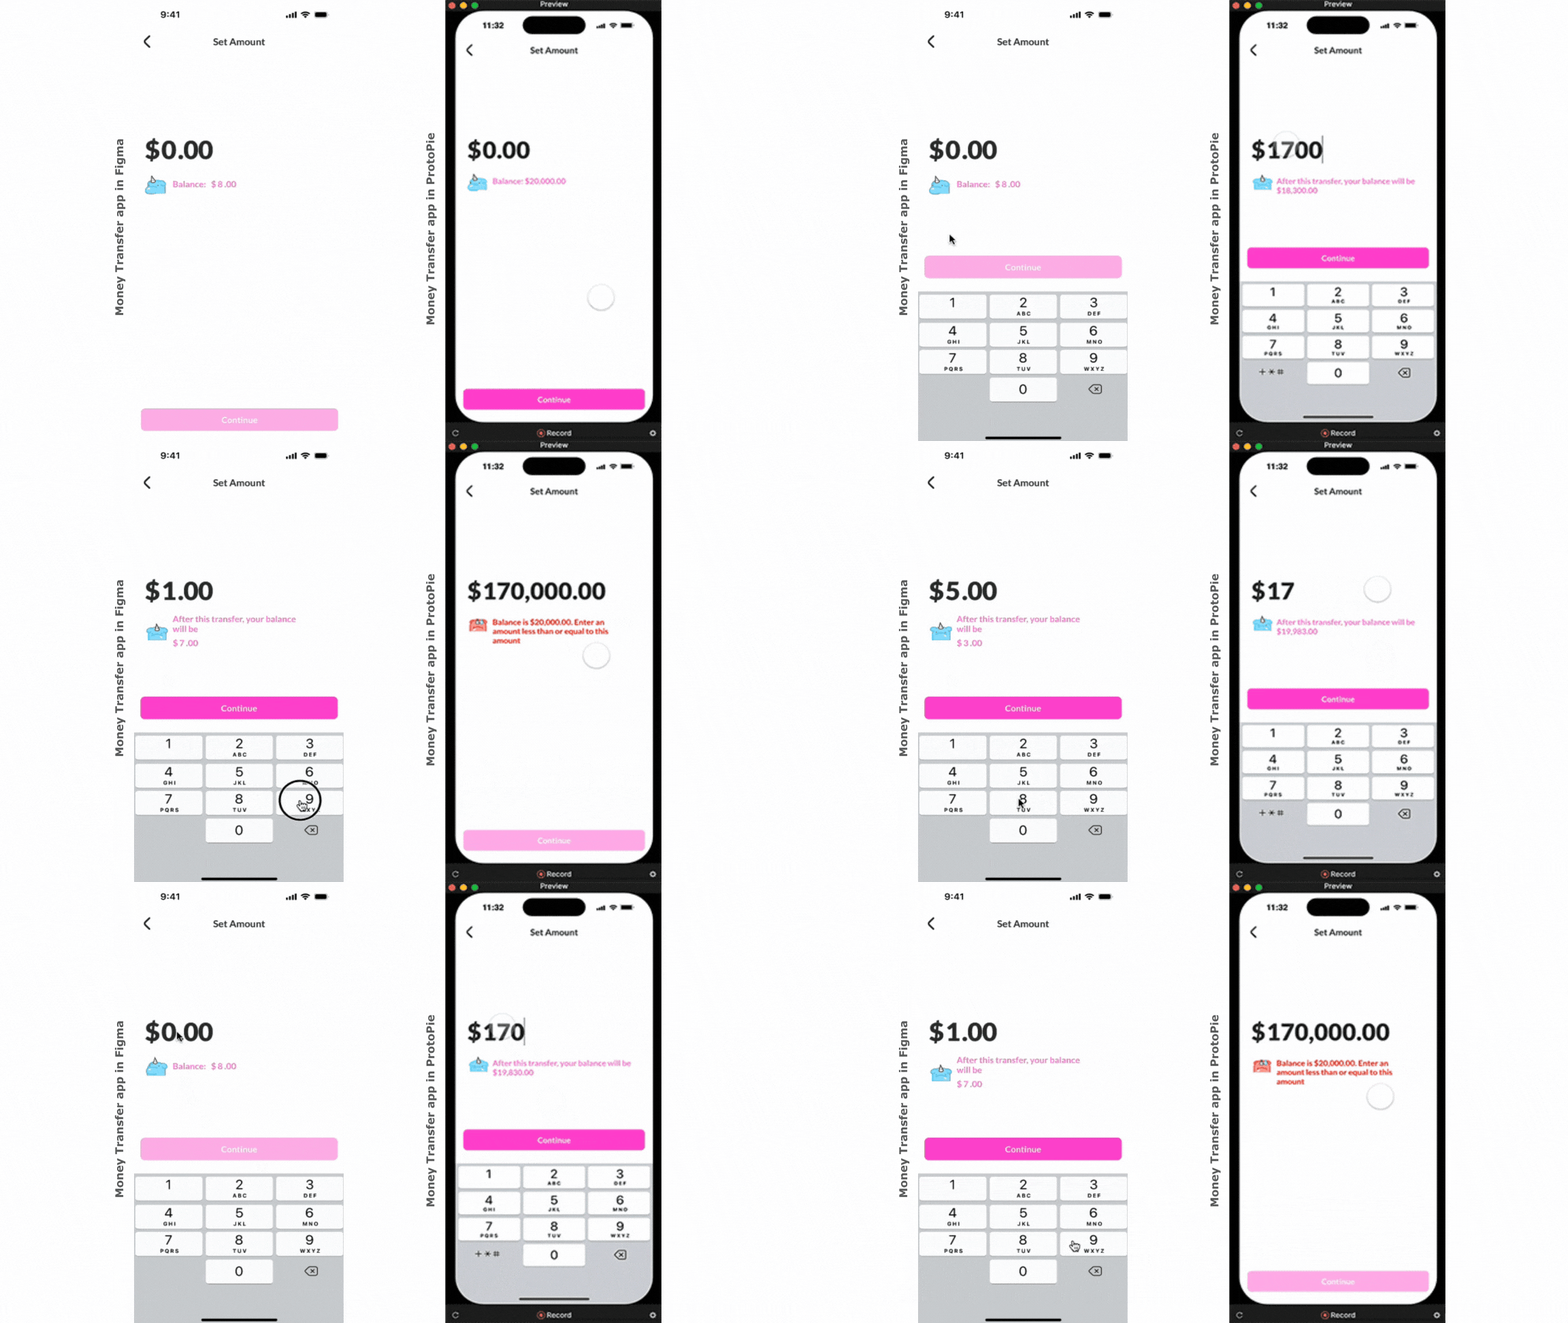
Even with some workarounds and extensive customization, notice in the output below how we still had to adjust the math with a custom balance of 8 to trigger the error message with the highest possible value we could enter with a single digit, which is 9.
.gif)
What would require an extensive setup in Figma (with many variables and custom inputs) can be handled in ProtoPie with just one formula and two variables—making the process much faster and more intuitive.
Experience the Figma file Here.
ProtoPie for advanced prototyping
ProtoPie is the #1 advanced prototyping tool for dynamic and multimodal interactions. The tool is great and lets designers do actual interaction design. You can easily add images, videos, music, and Lottie animations via JSON files, and seamlessly import your UI assets from tools like Figma, Adobe XD, and Sketch. Unlike other high-fidelity prototyping tools like Framer or Proto.io, the tool stands out as it requires almost zero coding skills.
Introducing ProtoPie Studio’s UI:
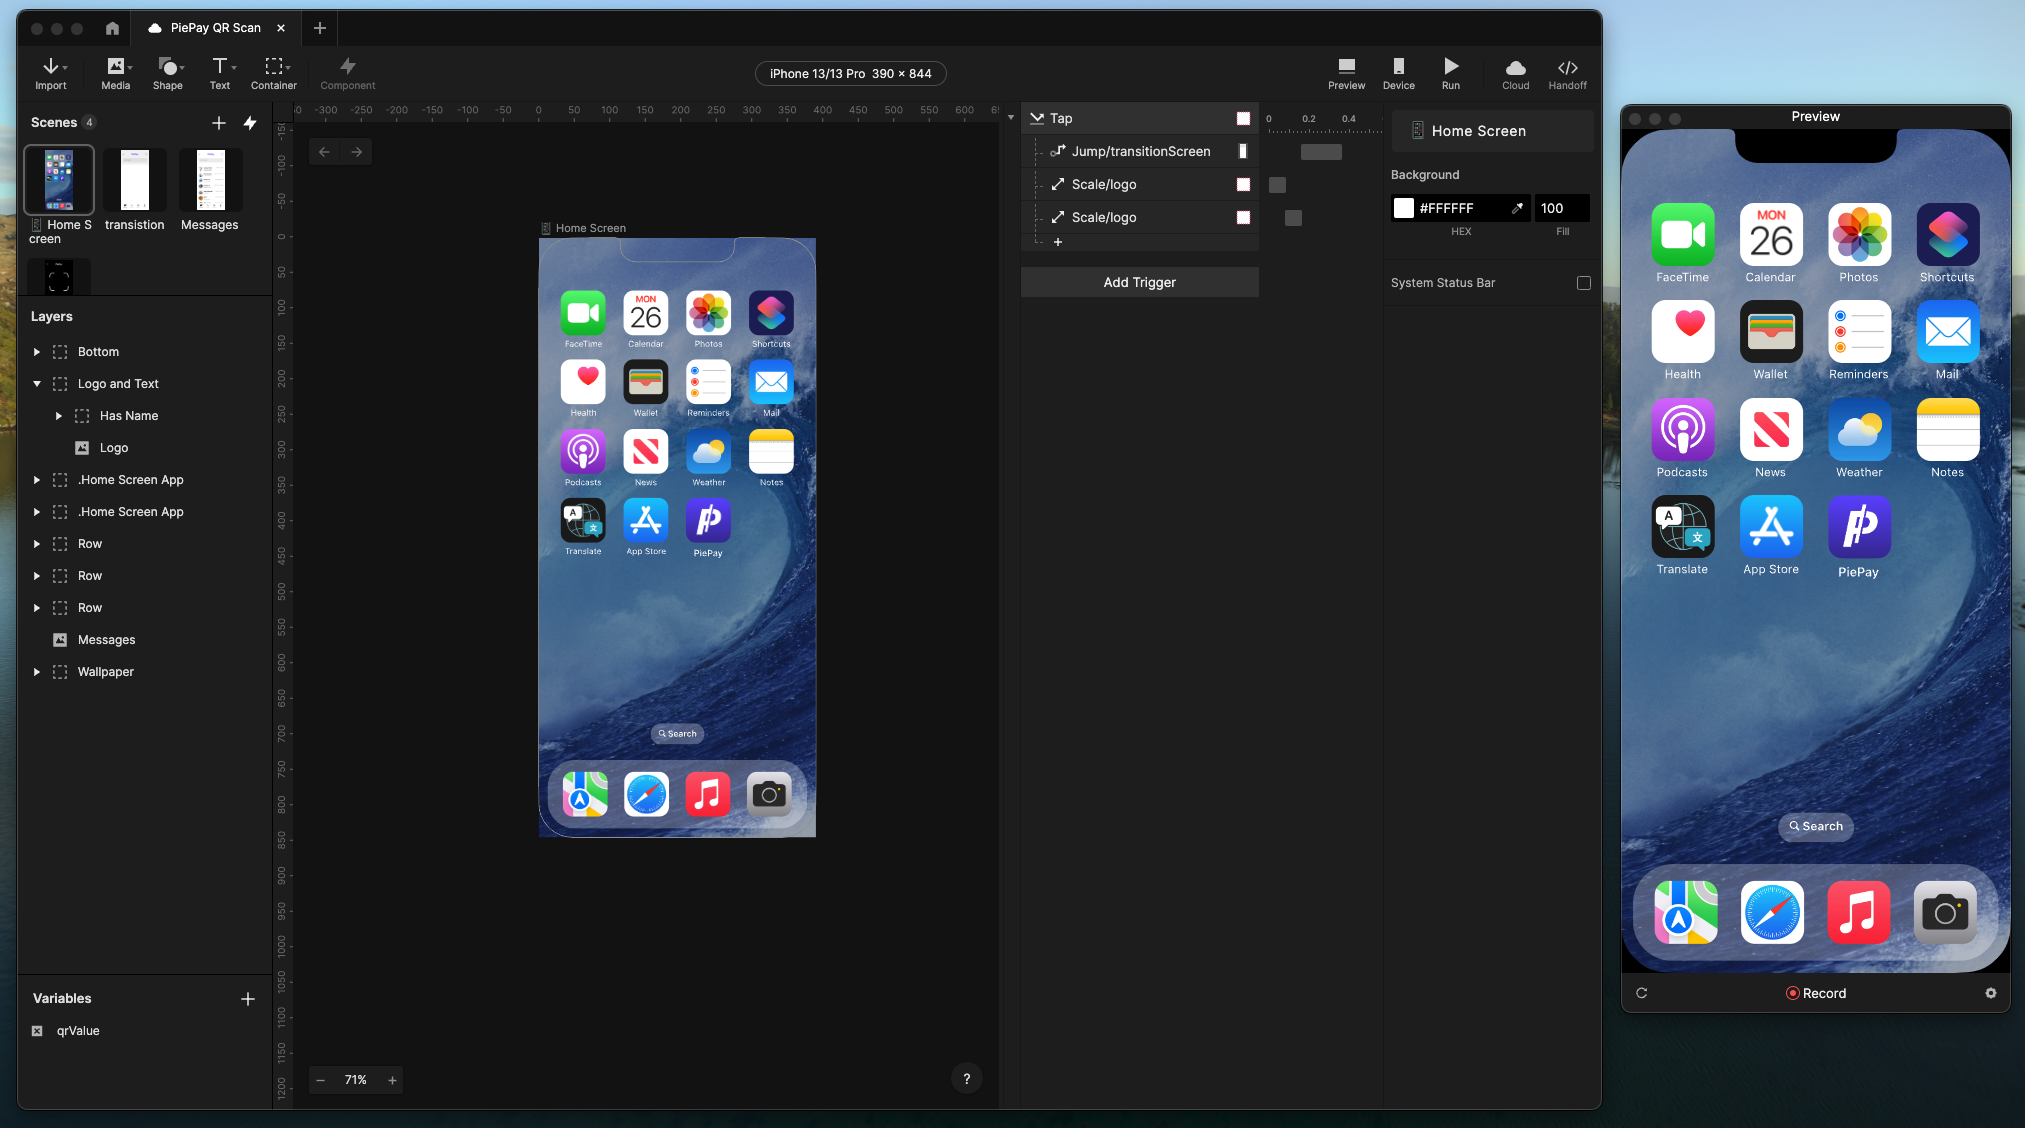
- Scenes: Each scene is like a frame, artboard, or screen. You can only preview one scene at a time, enabling you to focus on one screen at a time when crafting complex interactions.
- Layers Panel: Similar to other layer panels like in Figma, located on the leftmost end, it provides an overview of all the layers within the active scene, organized based on their hierarchy.
- Variables Panel: The Variables panel might feel new if you haven’t touched advanced prototyping in Figma, but it’s pretty much the same. You can add local or general variables. Each one can be a string, number, or color.
- Scene Preview/Canvas: At the center, you get the Scene preview of your active scene. You can also customize the frame size, pixel density, device orientation, and specific UI elements such as System Status Bars.
- Interactions Panel: On the right side is the Interactions panel, where you can create triggers (tap, click, swipe) linked to objects that trigger actions such as position, scale, color, and playback changes. You can also preview and adjust interaction timelines here.
- Properties Panel: Located at the rightmost end. Customize interaction properties such as width, height, position, colors, text style, and animation specifications.
- Preview Window: Use the Preview window to view your interactions in action and identify any errors before sharing your prototype.
- Device: Test your prototype live using the ProtoPie Player app on your mobile or tablet.
- Cloud: Upload your prototype to the ProtoPie Cloud and share the Pie link with your team & stakeholders.
- Handoff: Use the Handoff button to create an interaction recording that showcases user flows, element behaviors, and overall interaction integration within your prototype.
ProtoPie also offers advanced features like Component Libraries, Variables, Conditions, and Developer Handoff. To dive deeper into its full potential, consider exploring the ProtoPie School Courses.
Getting started with ProtoPie
ProtoPie goes beyond Figma’s limitations with complex interactions and validations. Let’s recreate the Money Transfer App but this time with ProtoPie.
Step 1: File setup. Import frames from Figma
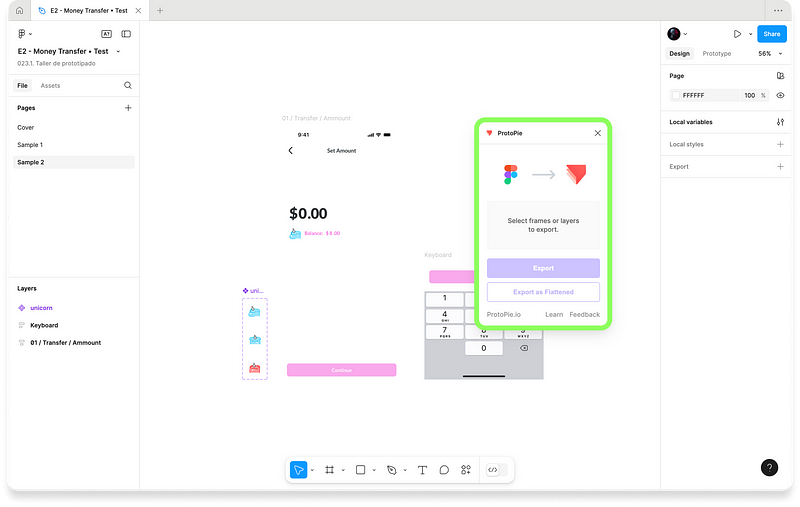
The first step is to import the Figma file into ProtoPie. Run the ProtoPie plugin in Figma.
.png)
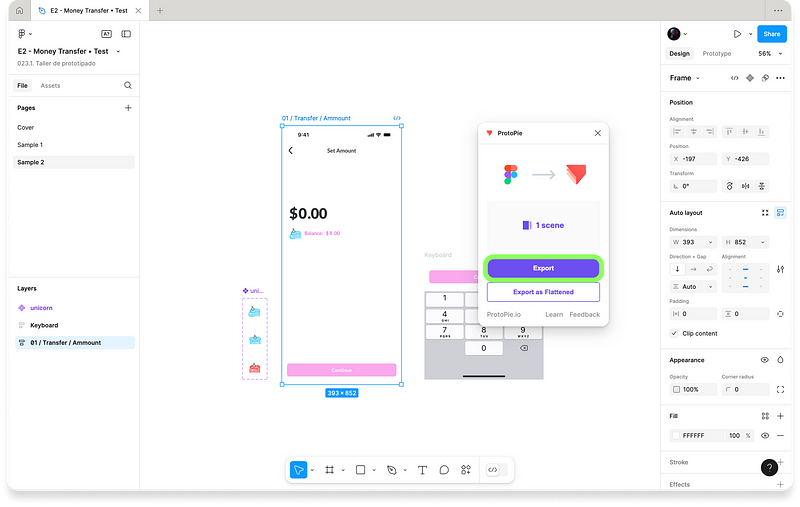
Select the Figma frame you need and hit the Export button. Wait and let ProtoPie do its magic. You will be redirected to ProtoPie once it loads all your design elements.
.png)
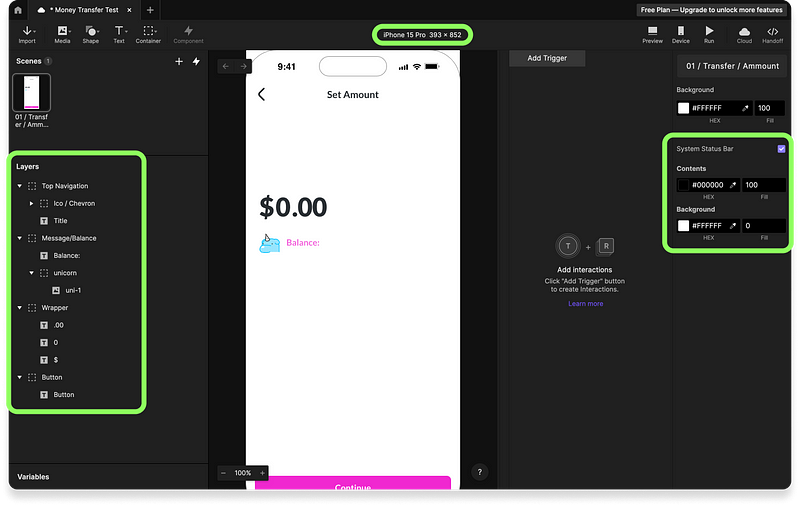
The frame will appear as a Scene in ProtoPie. Rearrange the layers if needed and set a custom Status Bar and Device (I’m working with an iPhone 15 Pro screen aspect ratio).
Below is the final setup. Now, you are ready to go beyond Figma’s advanced prototyping. Let’s move on and craft actual interaction design like a Pro.
.png)
Step 2: Configure for native input and keyboard interactions
Now, let’s add actual inputs and keyboard interaction. Create a new input layer. You can now add inputs using your native keyboard, directly into the layer.
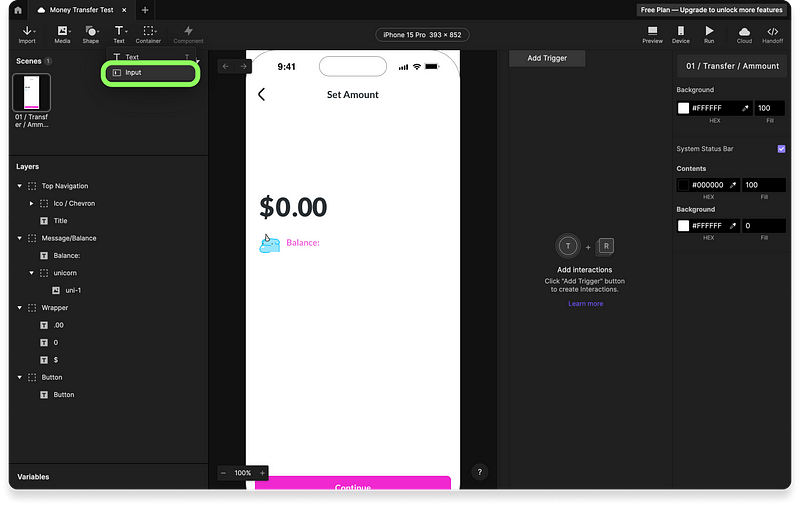.png)
Define its size and properties like placeholder text, font styles for both empty and filled states. Then set the keyboard that should display once you tap the input. In this case, we will display a numerical keyboard.
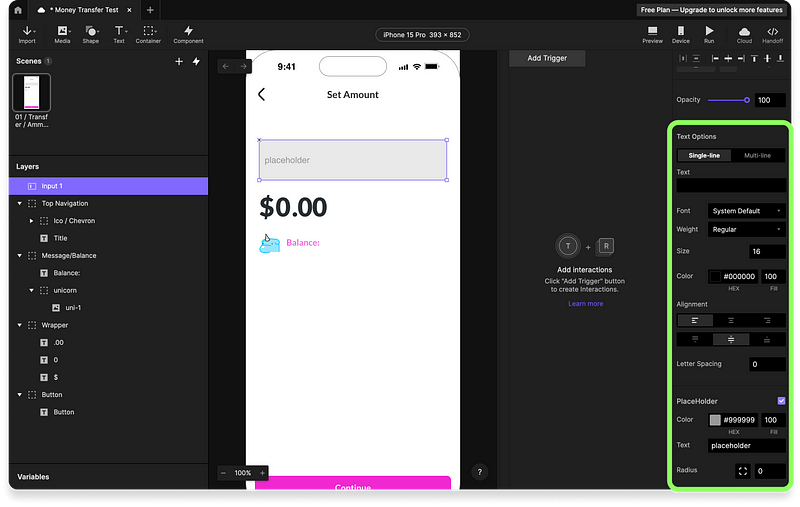.png)
Remove the original placeholder text/input field imported from Figma once the input field in ProtoPie is styled correctly. Rearrange its final location in the layers panel and use the Live Preview to test real-time inputs, which can be customized freely without creating a custom keyboard. Label the input appropriately, such as “MoneyTransfer.”
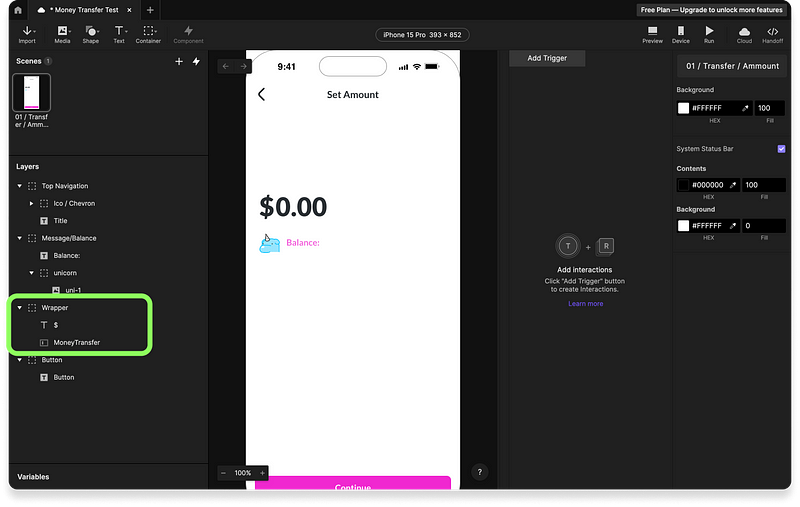.png)
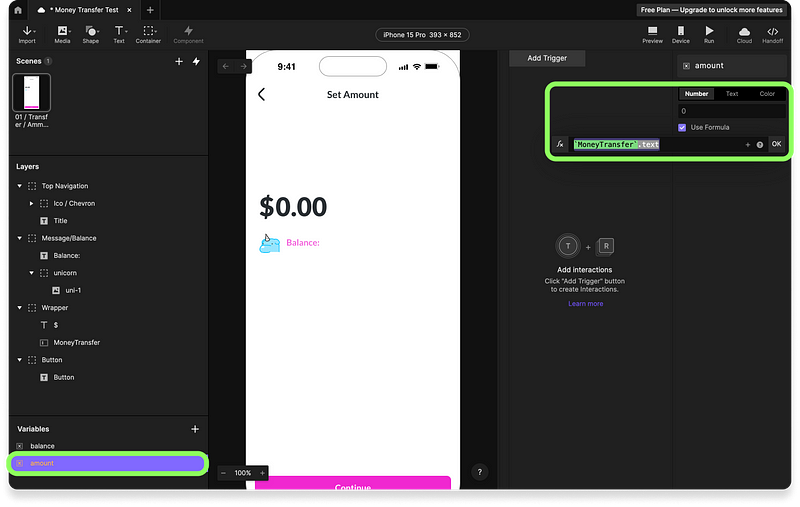
Now, to enable the math, we need to create two variables in the variable panel:
- Balance: Should be numerical and have a fixed value (say 20,000) so we can subtract the amount we type.
- Amount: Also numerical, but instead of a fixed value, it captures the real-time input from the “MoneyTransfer” field. Enable this by checking the “Use formula” checkbox and then add this formula.
`MoneyTransfer`.text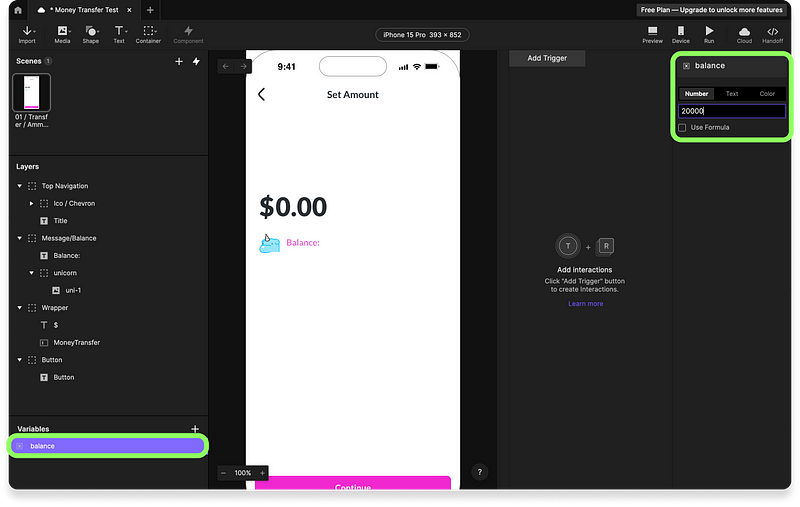.png)
.png)
Enable Debug mode by clicking the bug icon in the Variables panel next to each variable to see real-time updates as green badges. Adjust their position as needed, then use the Preview window to confirm that the “amount” variable captures the values when you type in real-time.
Step 3: Create error messages using Conditions, variables, and Formulas
The next step is to print messages. We can print 3 different messages according to these scenarios:
- Default state. When Balance variable = 20,000
- Error message for insufficient funds. When the amount variable > balance variable.
- Help message for the final balance. When 0 > amount variable < balance variable
For the initial validation, start by adding a Start Trigger. This will allow us to activate interactions upon loading this specific scene. Add a condition to the trigger to activate this interaction when the balance is 20,000.
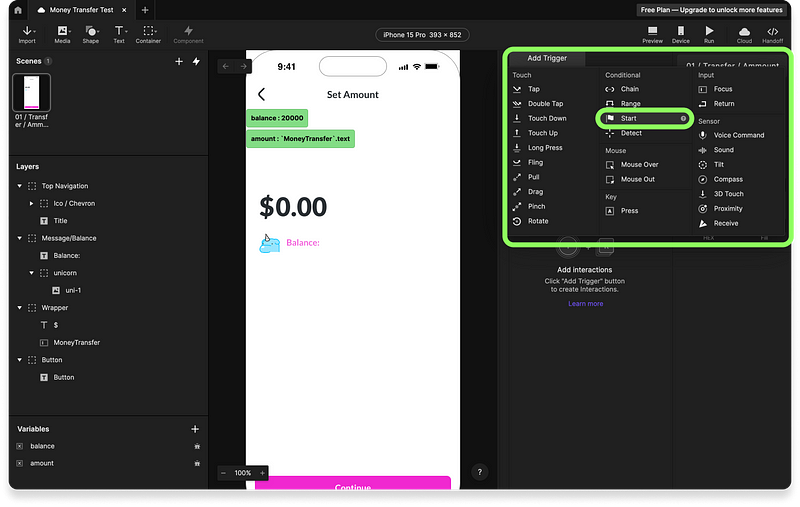
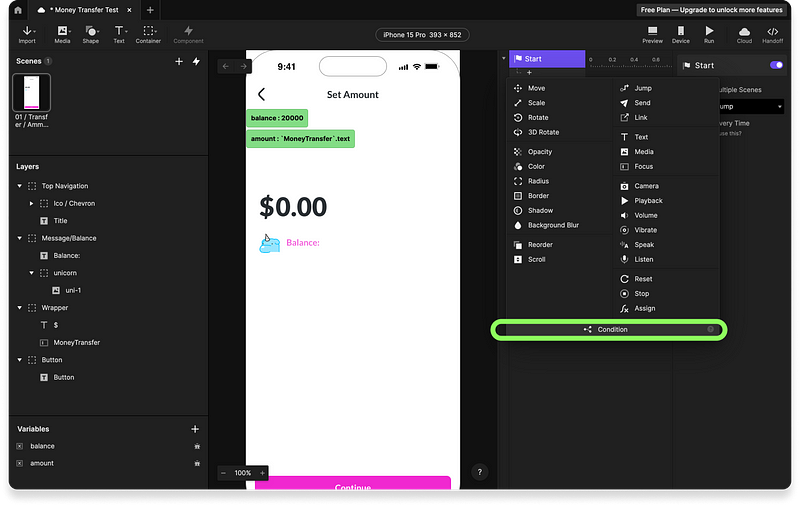
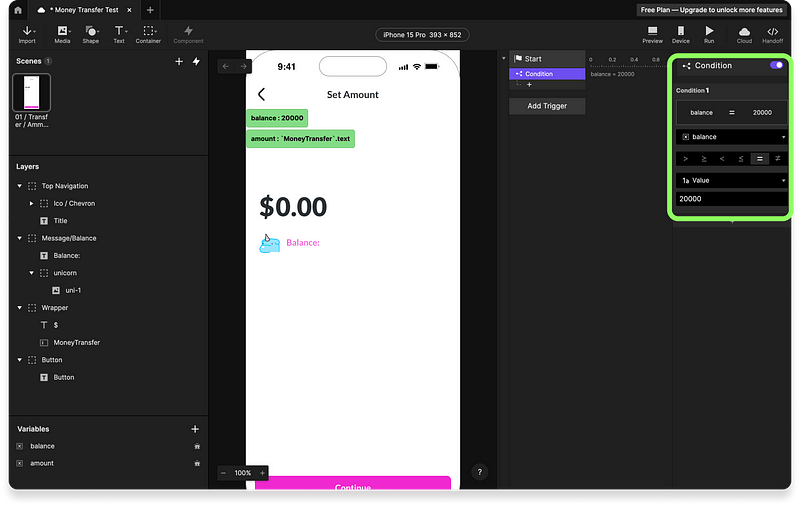
Now let’s rename your “Balance:” text object to “Dynamic message”. First, select the “Balance:” text object and make it editable.
💡Note: When you import frames from Figma, ProtoPie by default, will turn all your text into pictures.
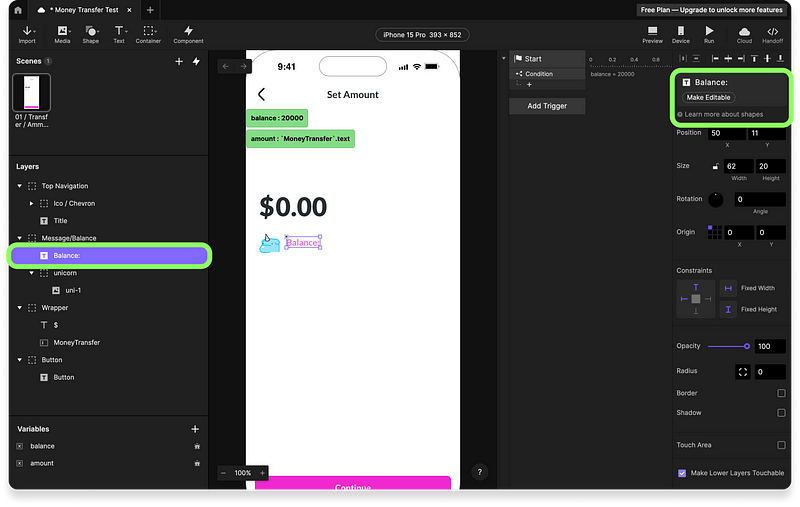
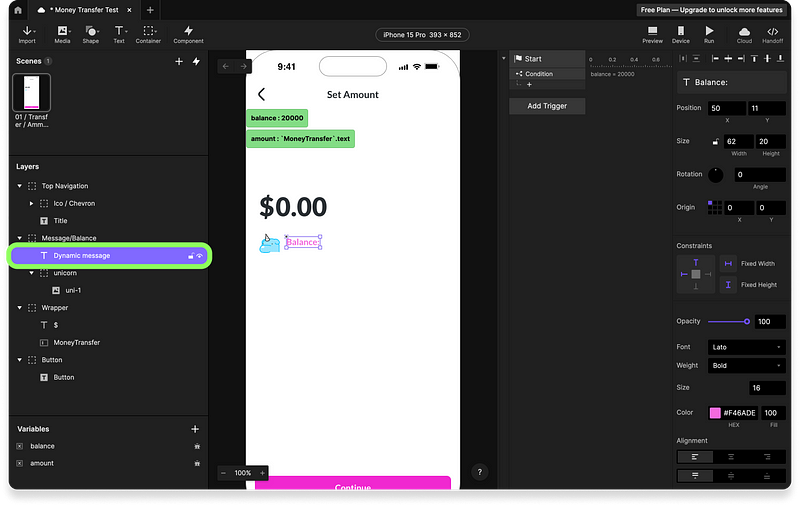
Rename to “Dynamic message”. We will change this text object each time with dynamic error messages based on the condition.
Go back to your Start Trigger and add a Text response. Select the “Dynamic message” object.
To ensure the scene opens in the default state, we will replace the dynamic message object with the balance variable value.
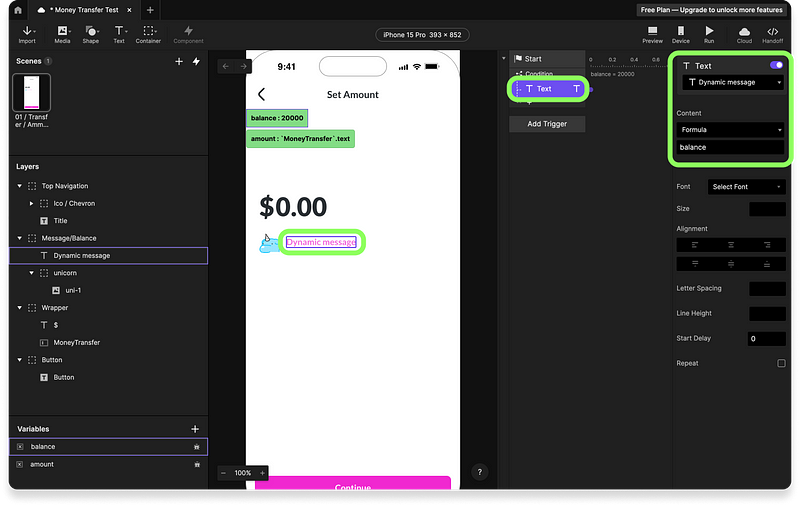
Run your prototype in the Preview window and if everything is set correctly, the “Dynamic message” text value will change to “20000”.
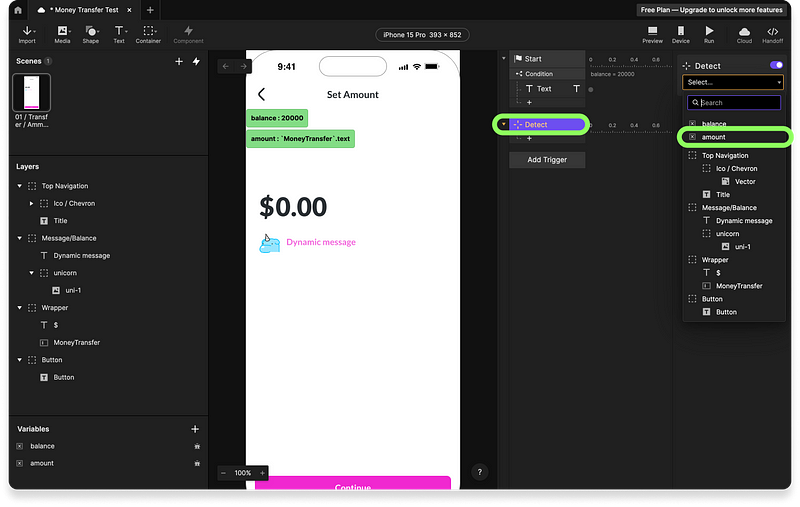
Now we move on to the second validation of displaying customized messages based on the 3 scenarios. Start with adding a new “Detect” Trigger.
Select the “amount” variable. This will let your prototype review the "amount" variable value each time your prototype meets certain conditions. Next, you will add 3 different conditions for each scenario.
.png)
A response is activated when a layer property or variable changes with “Detect” triggers.
Scenario 1: When balance = 20000 or amount = 0
The first condition will be the same as the Start trigger condition and text response. This will ensure your balance resets to the initial value i.e., 20000, if the user enters a wrong value in the “Money Transfer” input tab.
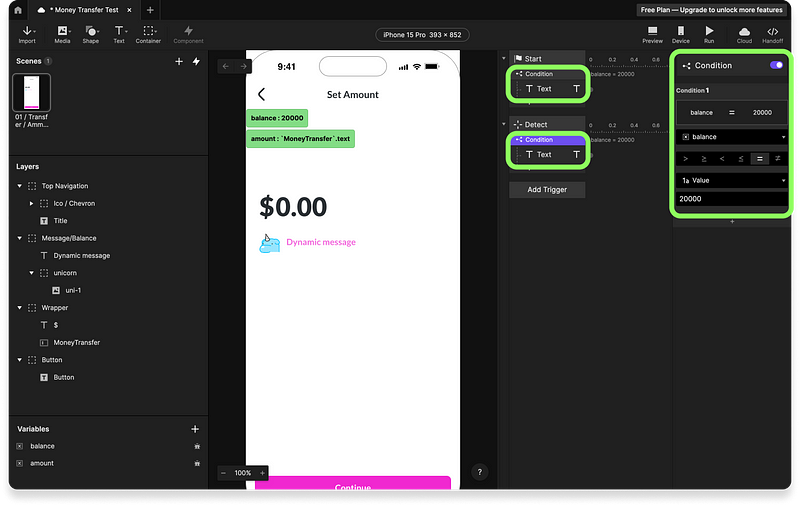
Scenario 2: When the amount variable > balance variable
In this scenario, the app should display an error message. Set another condition where amount > balance.
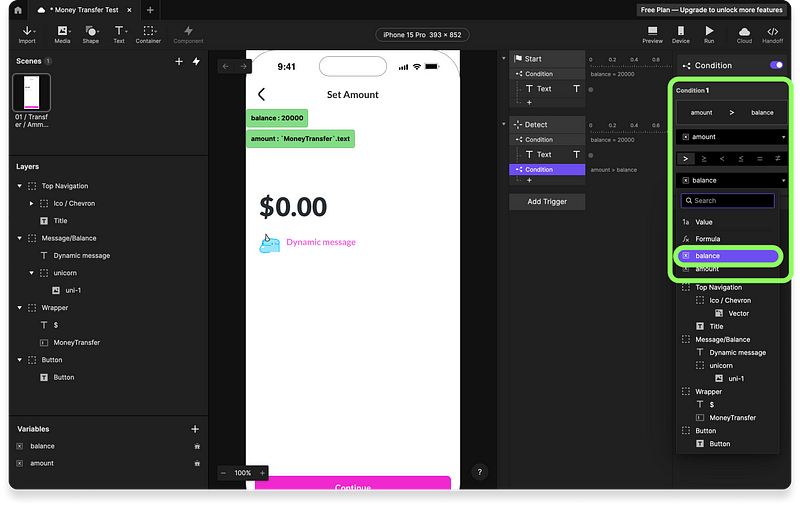
Select a text response with the “Dynamic message” object and add a string formula by typing the error message within “”.
“Set an amount equal or less than your current balance”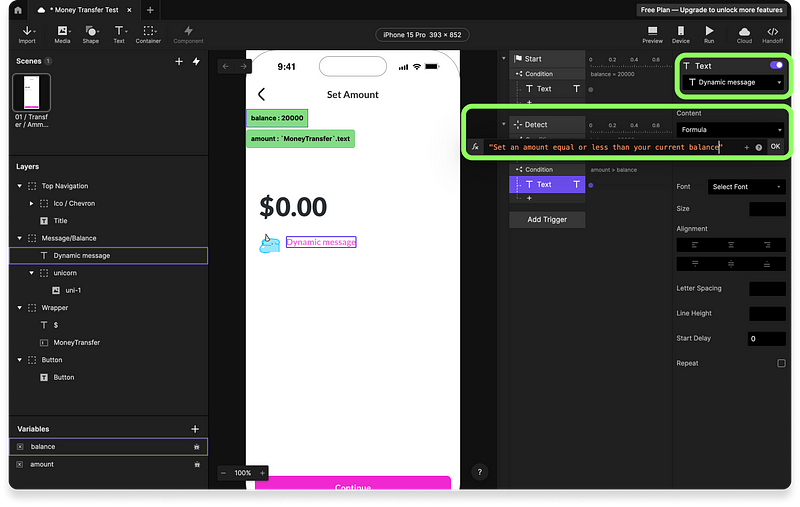
Test your prototype by typing an amount greater than 20,000. Go back to 0 to see if the first validation is running properly and the Dynamic message text object goes back to 20000.
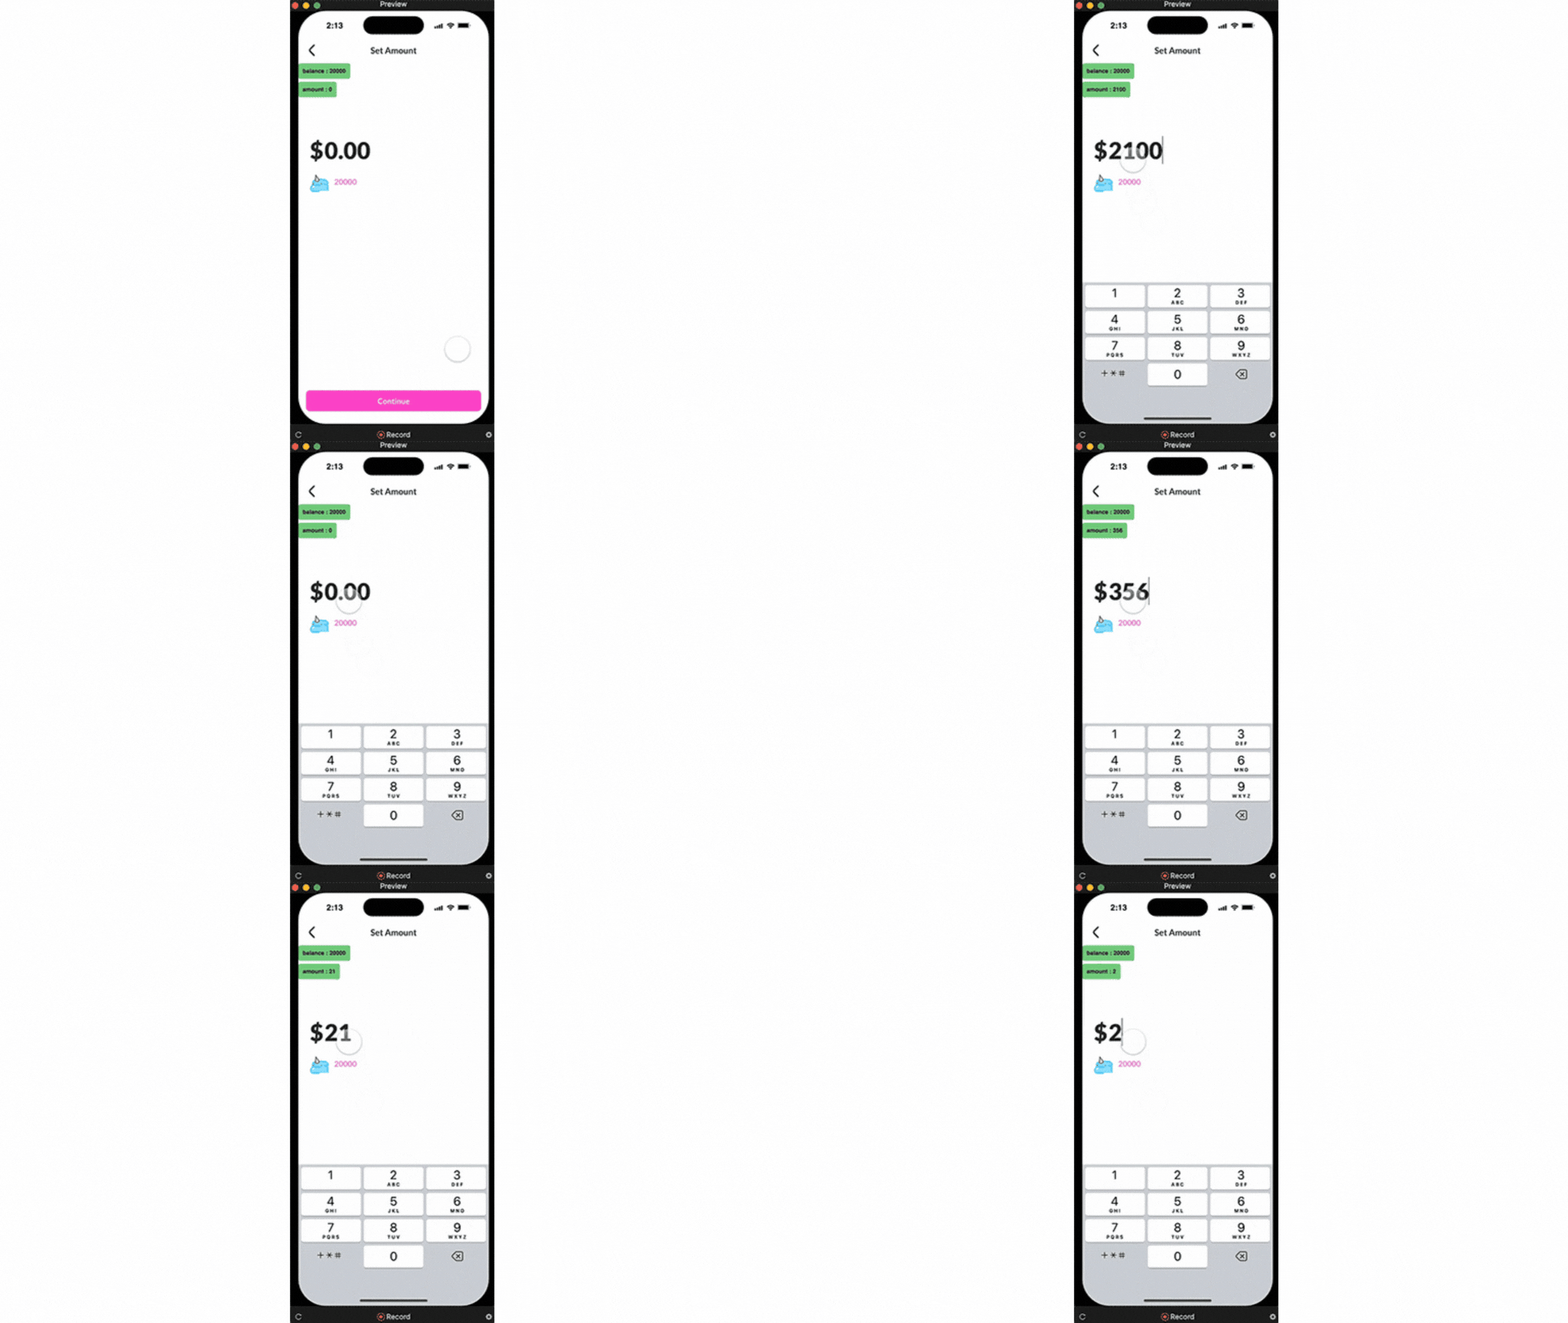.gif)
Scenario 3: When 0 >amount< 20000
You can duplicate the condition setup from the previous scenario and add 2 conditions: amount < balance and amount > 0.
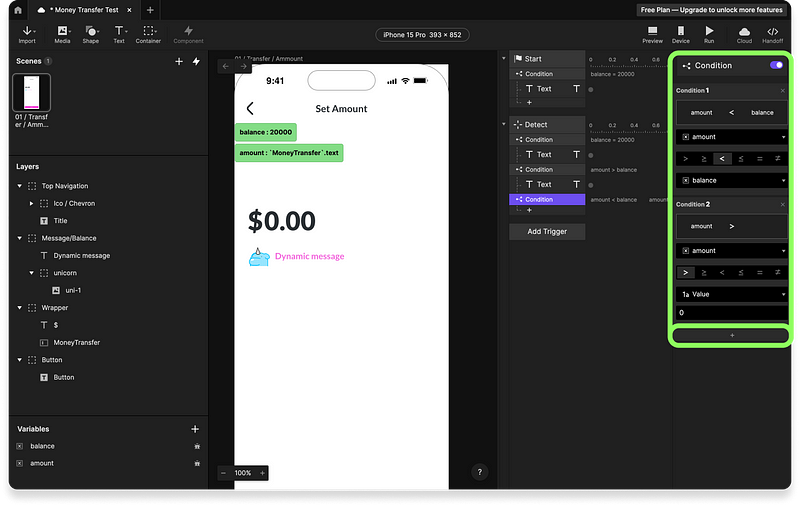
This time the message here will be the balance after our money transfer. We will add another Text response and set the formula like this:
balance - amount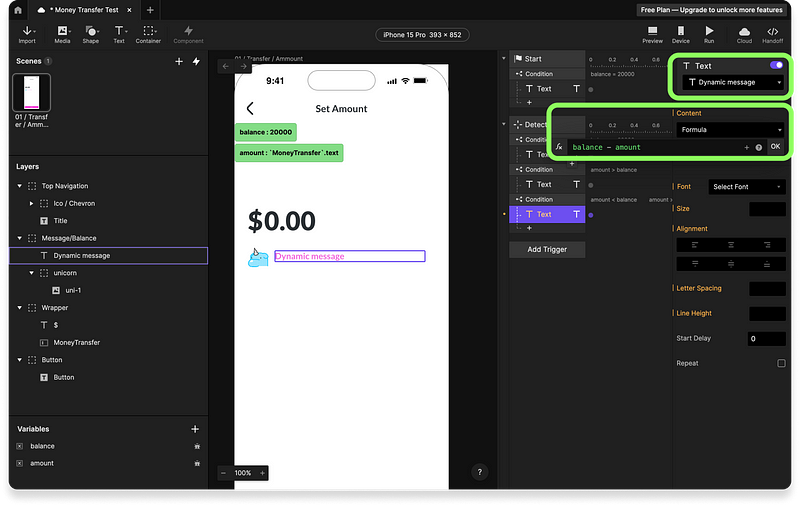
Run your prototype. See how we get our 3 different custom messages in our Dynamic message text object with just one simple formula and 2 variables, bypassing the one-digit and maximum 9-number limitations from Figma.
.gif)
Creating advanced interactions & animations
We managed to set the foundational logic so far and now it’s time to enhance your interactions with advanced string formulas, dynamic customization with data, and squishy animated unicorns.
We will start with customizing our help and error messages with advanced string formulas and conditions. Then we will uncover ProtoPie’s flexibility with customization. In the end, we will apply the same logic to integrate custom animated unicorns with production-ready JSON files with Lottie.
Step 1: Create advanced interaction using formulas, conditions, & formatting
Now let's format to print 3 different messages in our Dynamic message text object. We will use a custom formula to print unique messages when we come across any one of 3 different condition events in our Detect Trigger.
Scenario 1: Default state or when amount = 0
Let’s add some format to our first message.
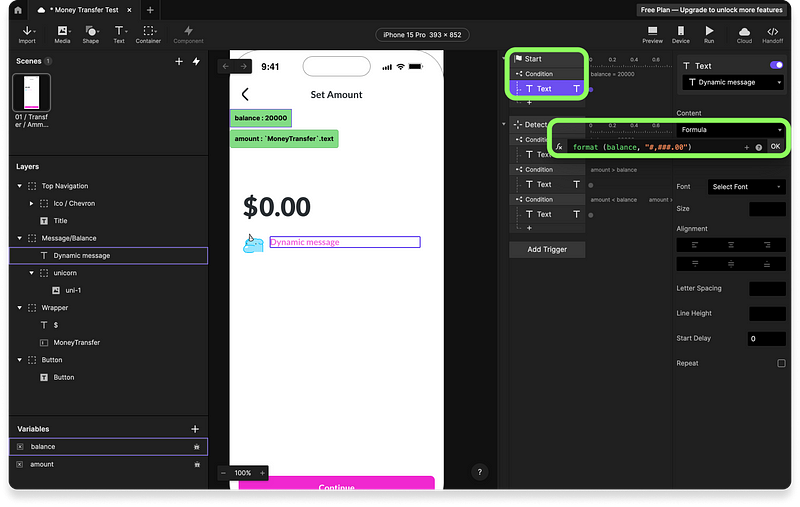
- Add the commas (,) and the dot for cents (.). To accomplish this formatting you need to encompass your balance variable with this formula:
format (balance, "#,###.00")- Copy and paste it into your Start Trigger and your Detect Trigger’s first condition event. It should look something like this.
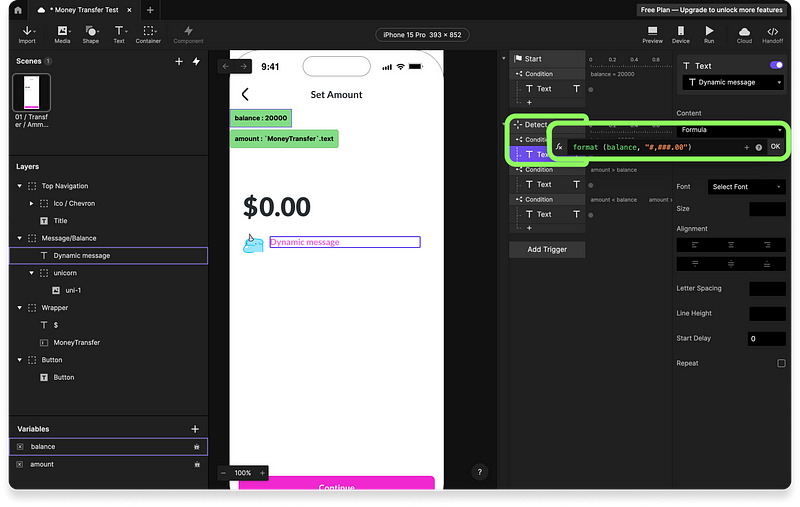
- Add a plain text string that prints “Balance” and the “$” before the amount
"Balance: $" + format (balance, "#,###.00")Update the formula in both Start and Detect Triggers and run your prototype. If done correctly, each time your prototype goes live, the Dynamic message will print: “Balance: $20,000.00”.
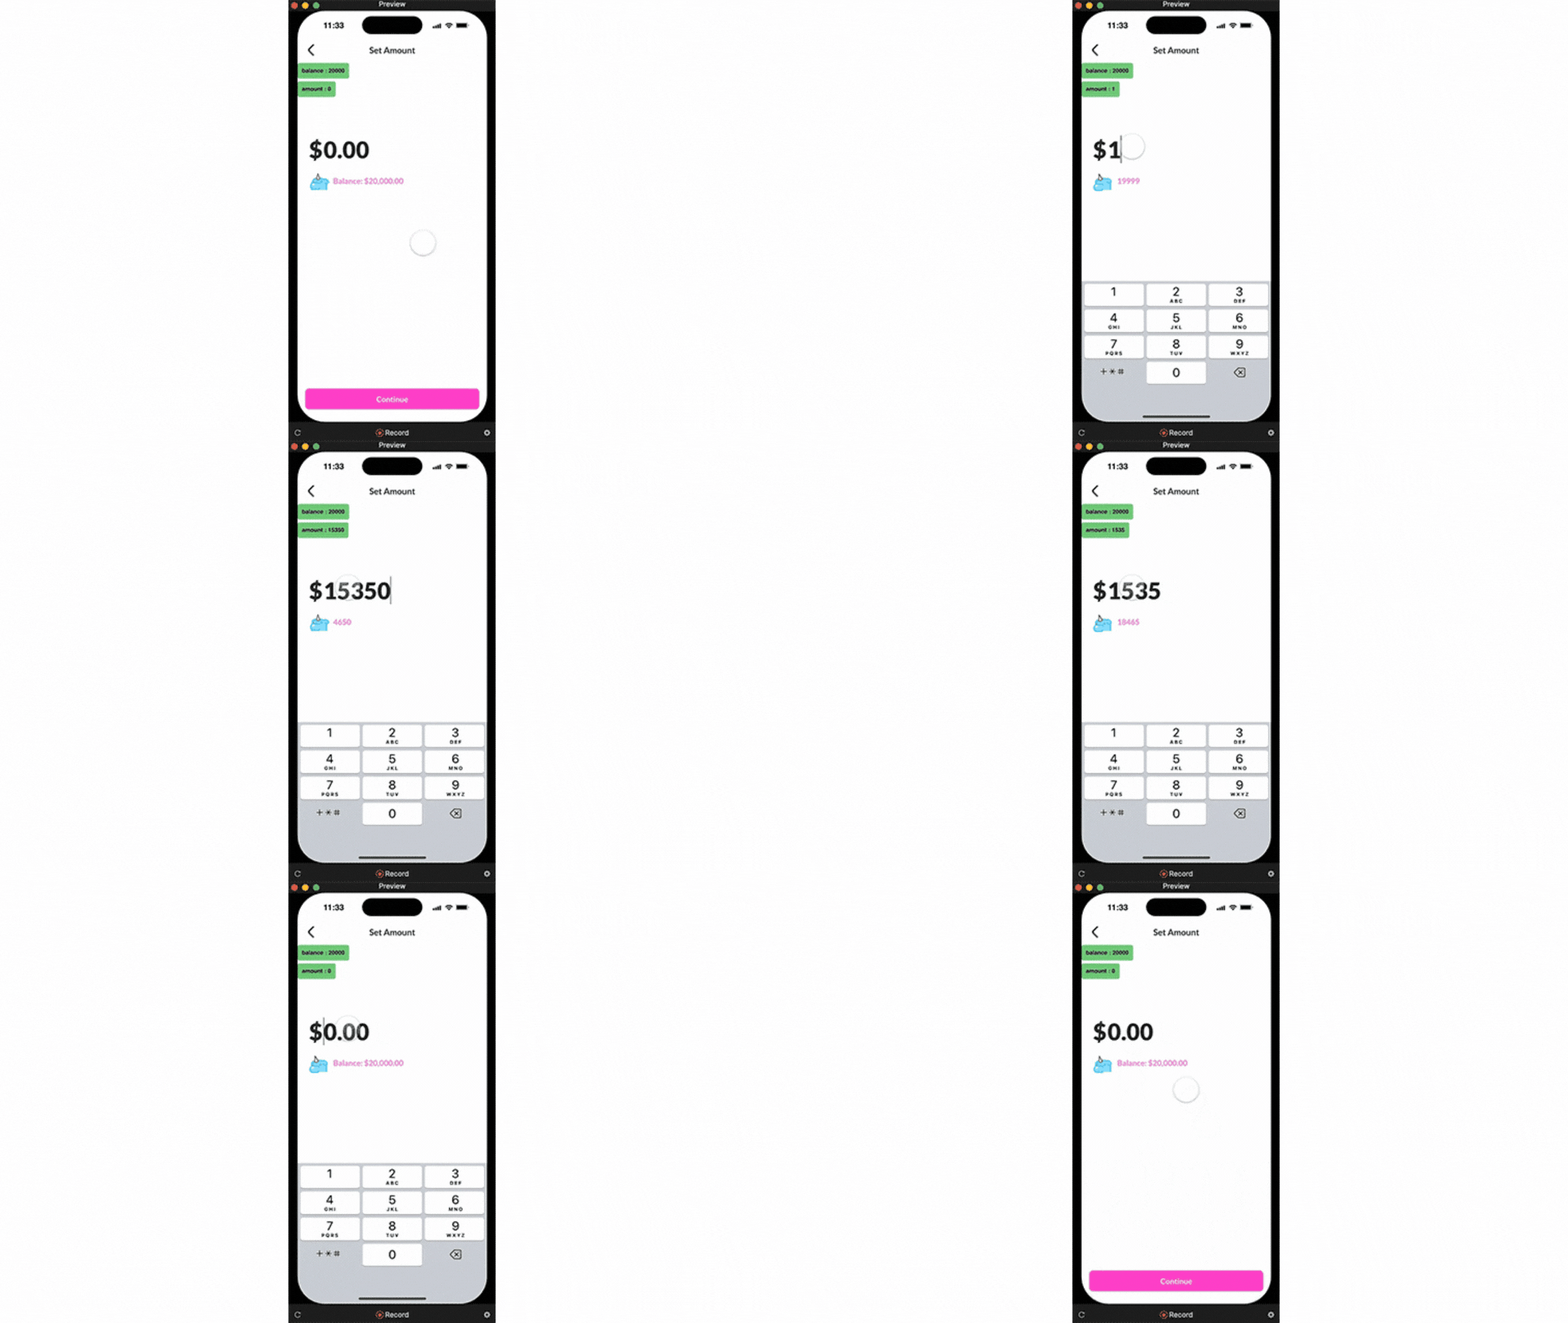.gif)
Scenario 2: Error message for insufficient funds.
- Erase the generic error message and set the formatted balance variable in your Detect Trigger second condition response.
format (balance, "#,###.00")- Add a plain text string that prints the user’s current balance followed by the error message.
"Balance is $" + format (balance, "#,###.00") + ". Enter an amount less than or equal to this amount"Notice how ProtoPie adds colors so you can tell which parts of your formula are strings, numbers, or operators.
Update the error message again and run your prototype.
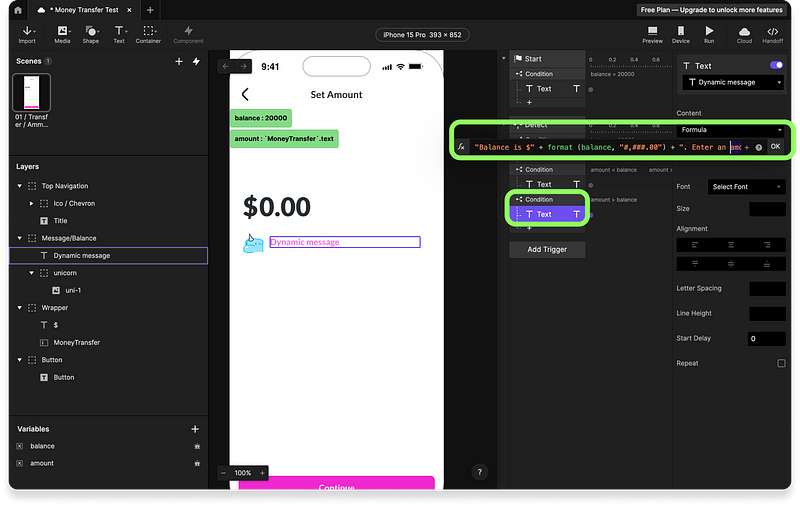
Scenario 3: Help message for the final balance.
- Basic formatting will encompass our main subtract operation. Copy and paste it into your Detect Trigger third condition event.
format (balance - amount, "#,###.00")- A first string will be added to give context that the operation shown below is your balance after the transaction is complete. Encompass your custom message with quotes and set an add (+) operator.
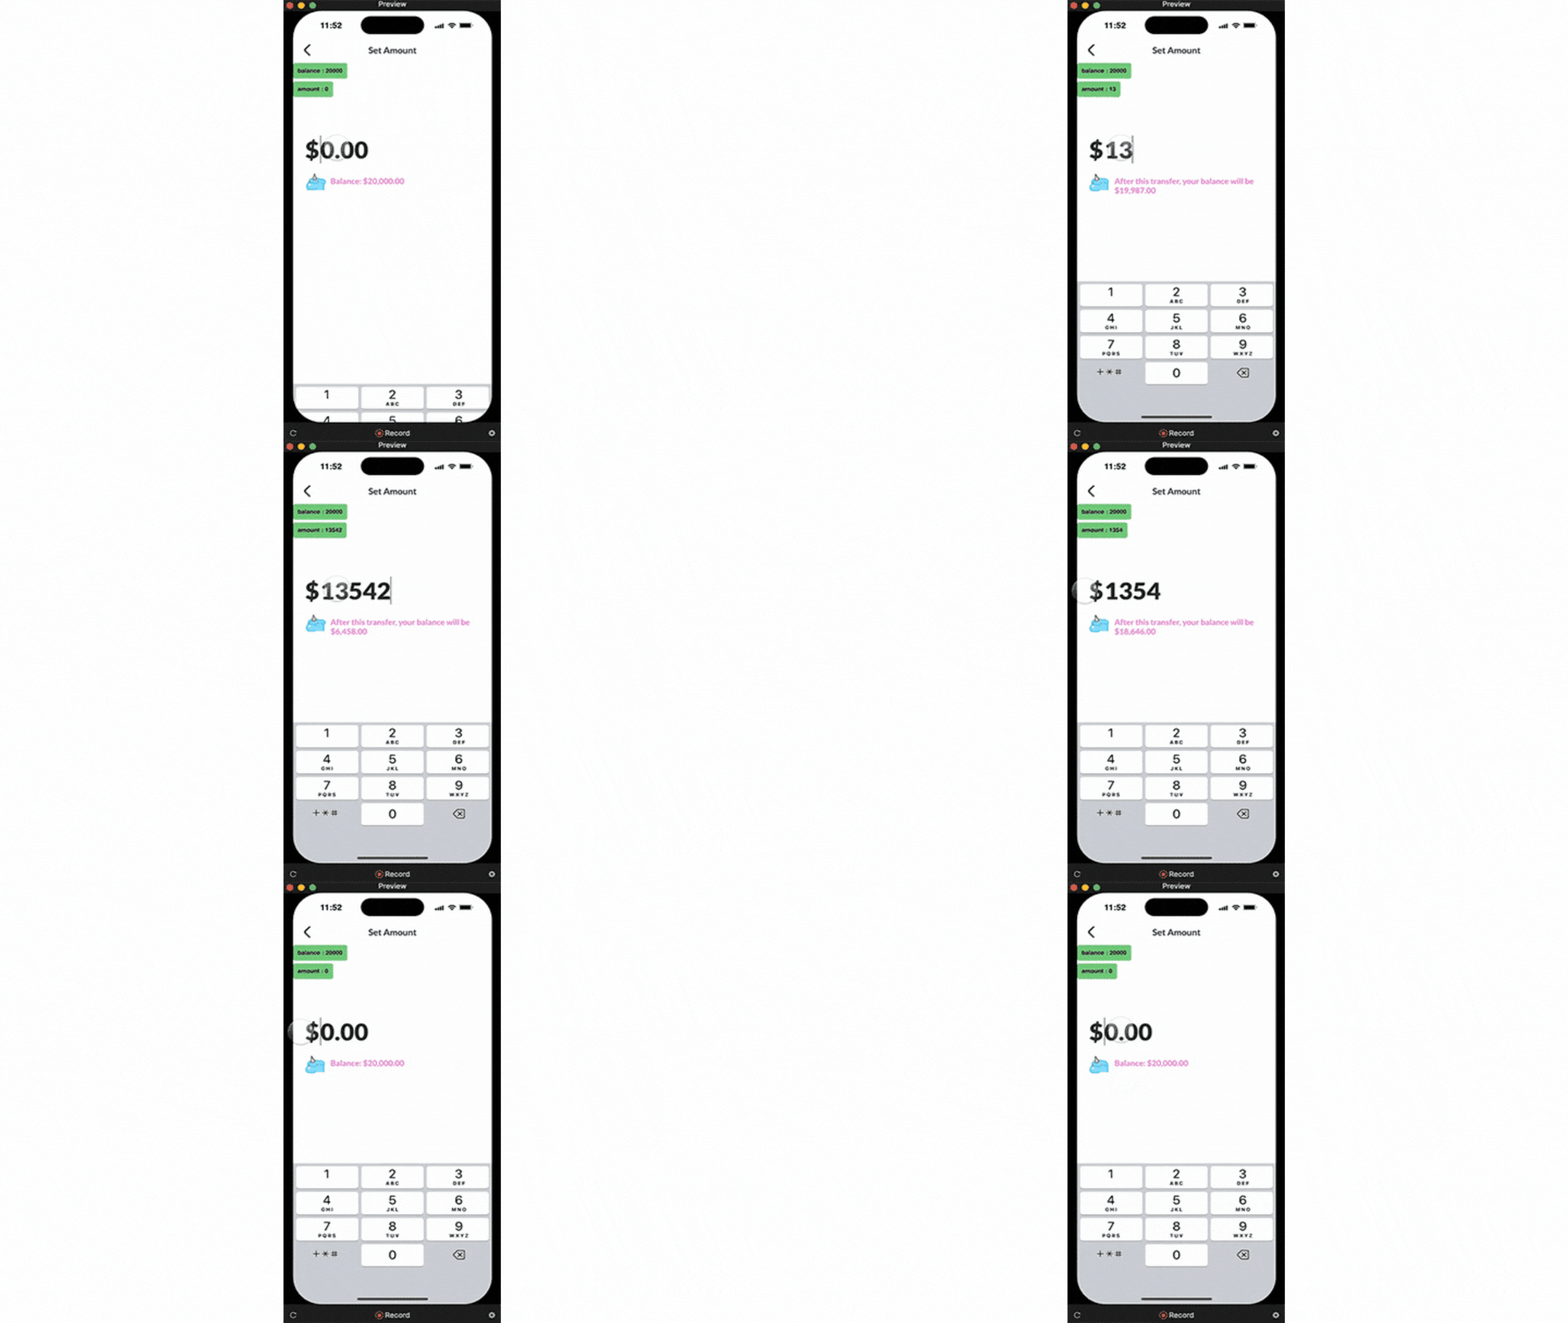
"After this transfer, your balance will be $" + format (balance - amount, "#,###.00")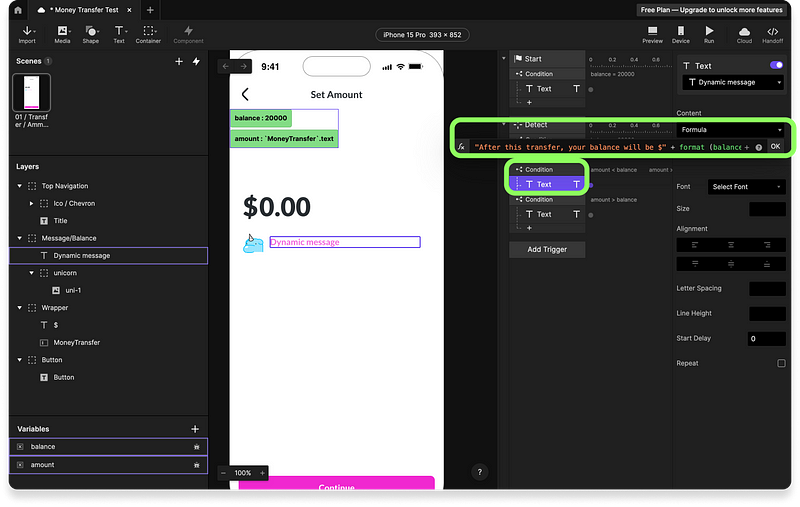
Update your formula and run your prototype. Now, each time you type an amount, the Detect Trigger will print a message showing the user the amount left in their account after their transaction is complete.
.gif)
Step 2: Customize feedback and error messages
Now we will customize the error message and craft the enable/disable interaction of our button.
Customize text color for error messages
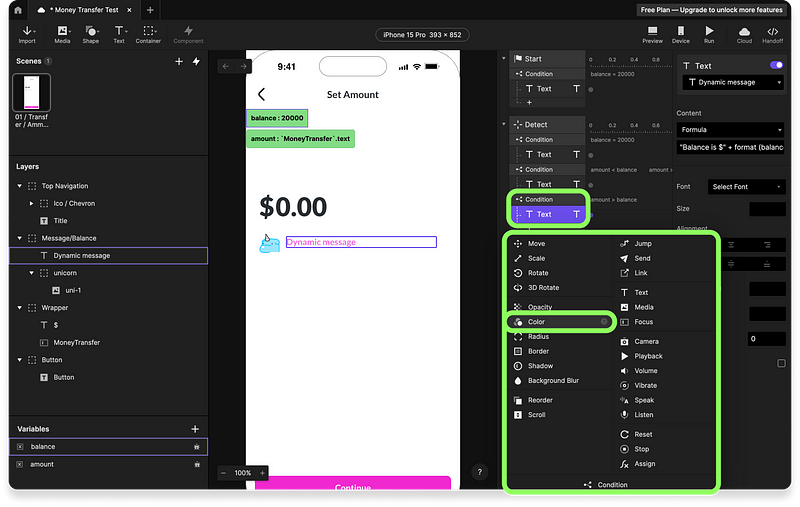
- Add a Color event to the 2nd condition of our Detect Trigger. Select the Dynamic message text object and set the fill color to #FF0000. If you run the prototype live, the color will change to red as we hit the error condition, but it won’t come back to pink.
.png)
💡Note: The order might differ depending on how you have arranged the detect condition in your trigger panel
- Set another Color event to the 1st and 3rd conditions to get back to the original color. This time the fill color will be #F46ADE.
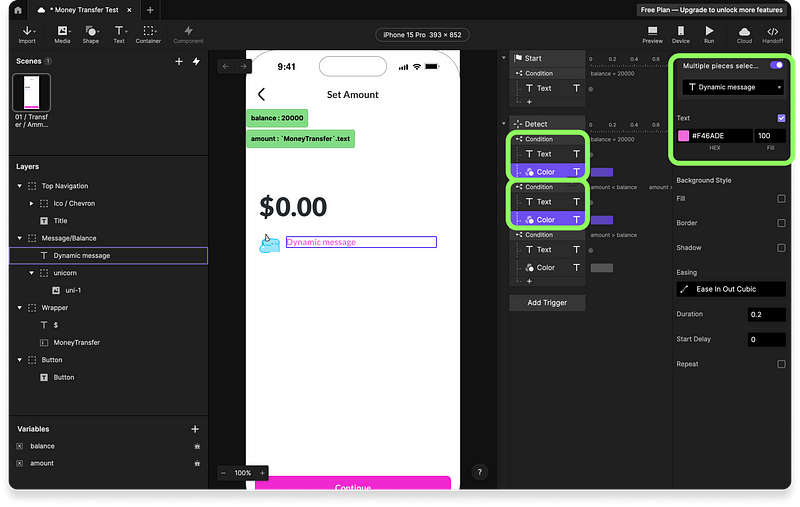
💡Note: The order might differ depending on how you have arranged the detect condition in your trigger panel
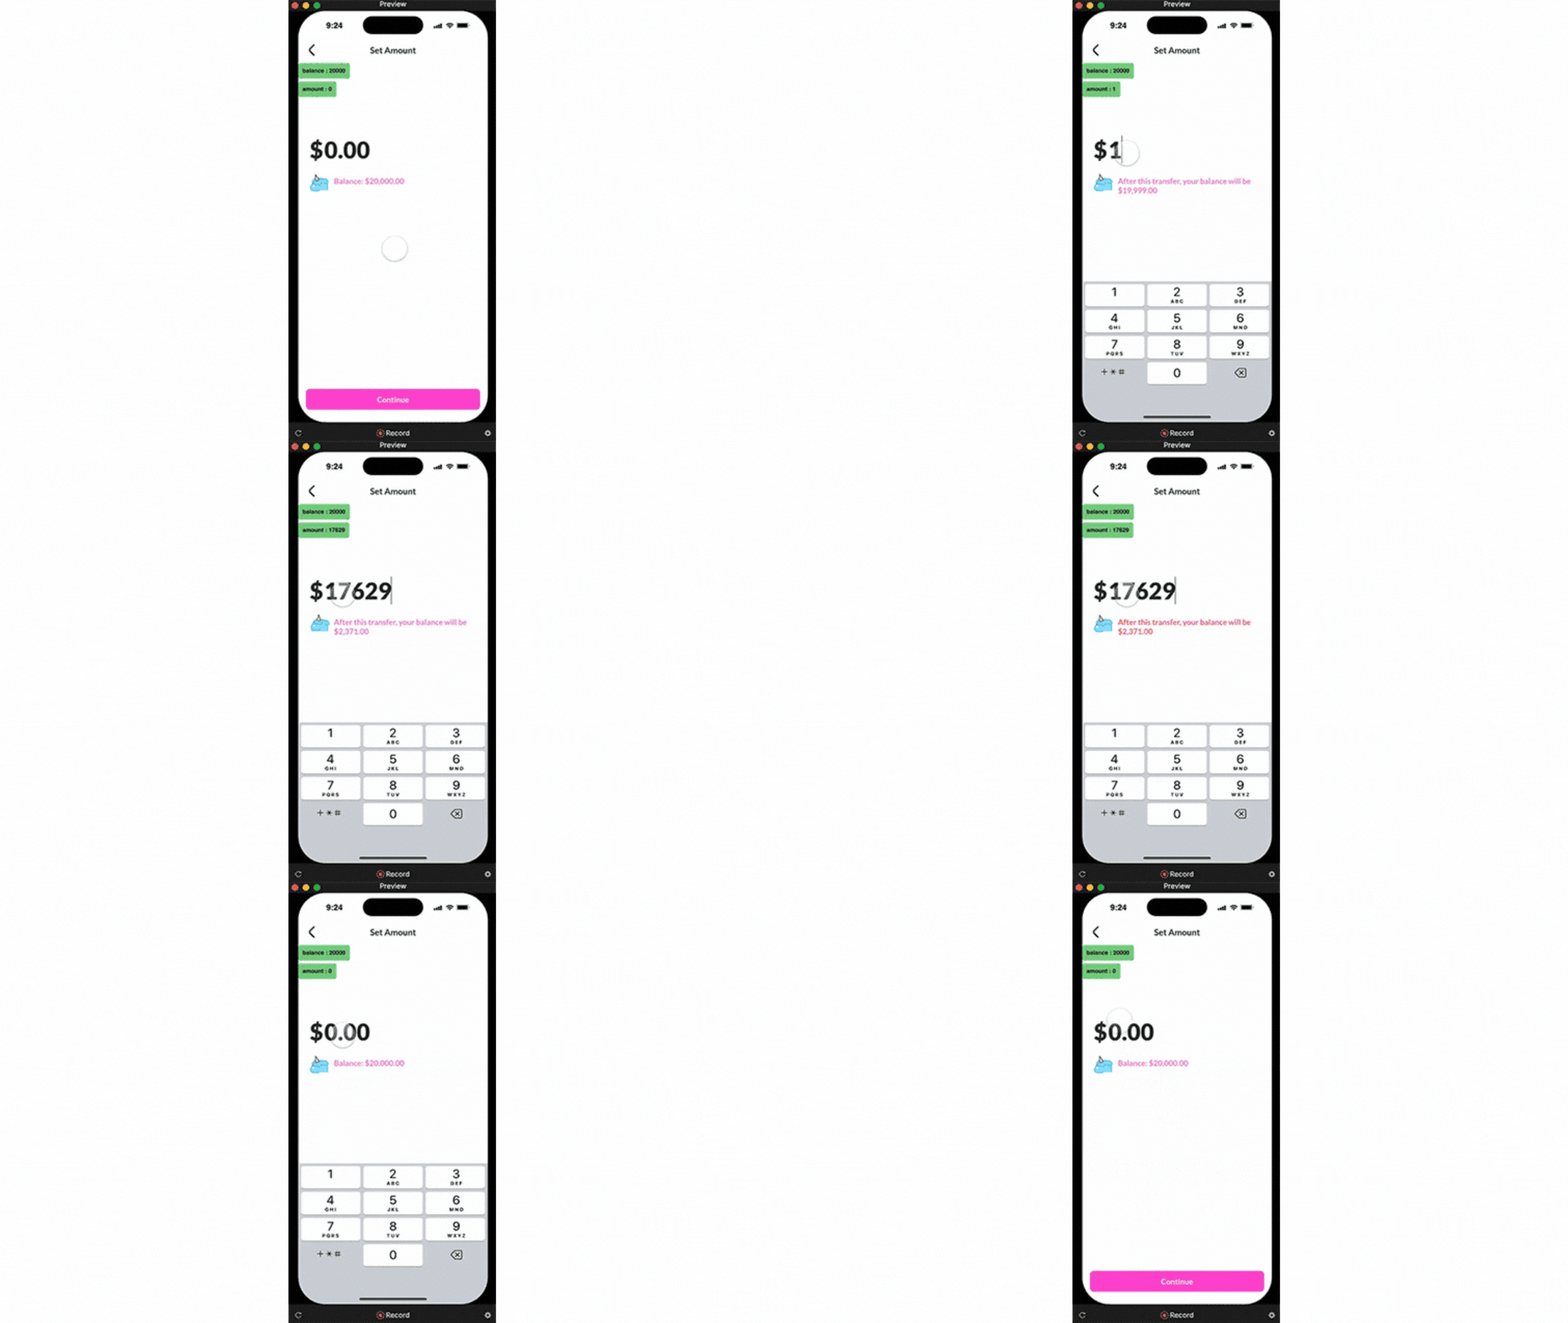
Run the live prototype and watch how the Dynamic message turns red as we hit the 2nd “error” condition. It goes back to pink as we meet the 1st and 3rd conditions as well.
.gif)
“Submit” Button Customization
The enable/disable button interaction is as simple as changing its opacity with the same logic. But we will need to adjust a few things before we get there.
- Select the MoneyTransfer input and add a Focus Trigger. Set the Focus In option and add a Move response.
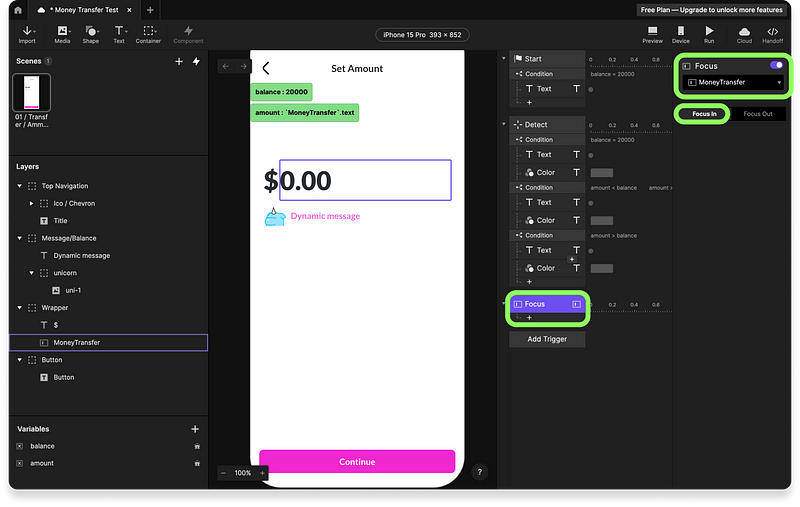
- Select the Button object for the move response and set it to Move To Y:490. Now the Button will go up as we focus in our input, but it won’t come back to its original place once we focus out.
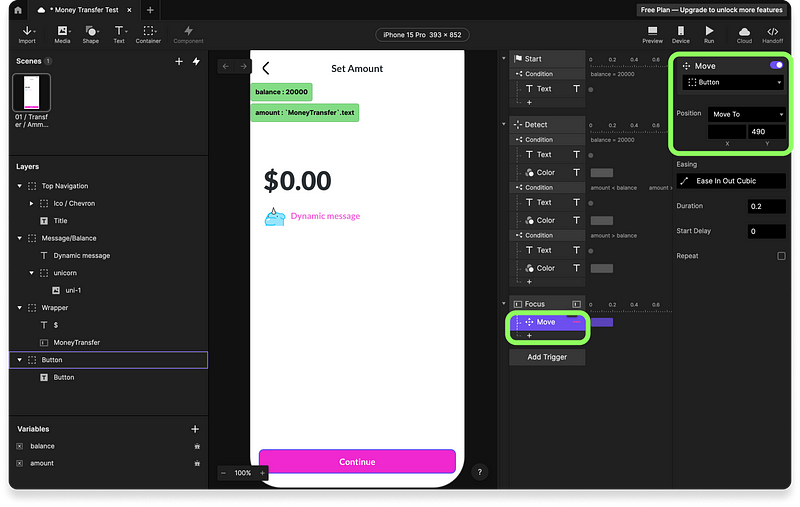
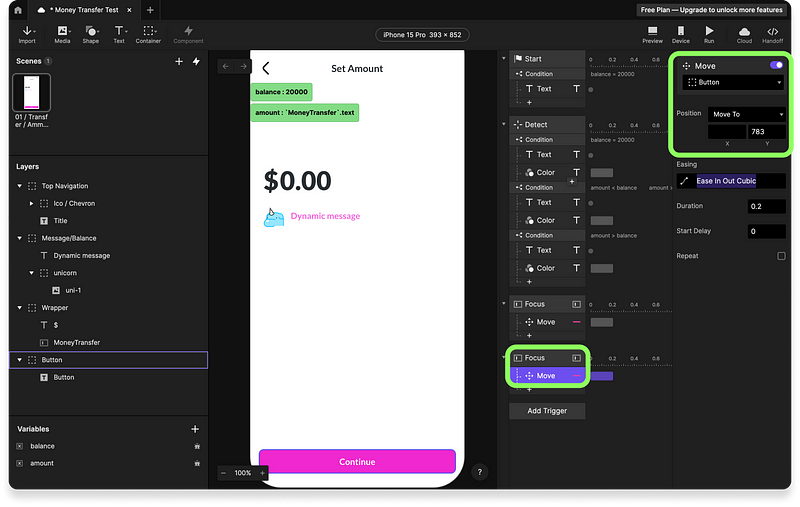
- To move back the button to its original position, add another Focus Trigger, now with Focus Out selected. Set another Move event to the Button object and let it Move To Y:783.
- We can customize our amount as we focus out too. Add a Text event to the above Focus Trigger set in Focus out. Make it point to our MoneyTransfer input object and set its content as Formula. Add this format formula so we get the commas (,) and dots(.) for the cents.
format (amount, "#,###.00")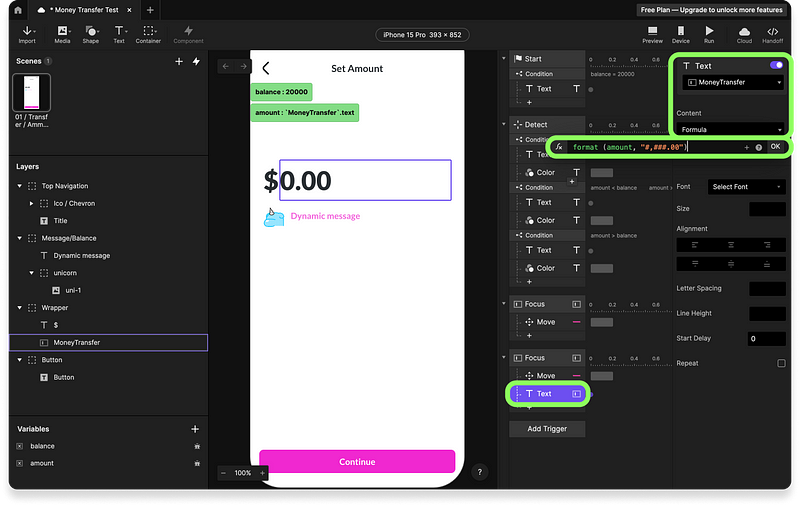
- Lastly, we will add the enable/disabled interactions. Just add 3 Opacity events in your Detect Trigger. 1st and 3rd condition will set our Button object to 100% opacity while the 2nd condition, which is the error state, will set it to 40%.
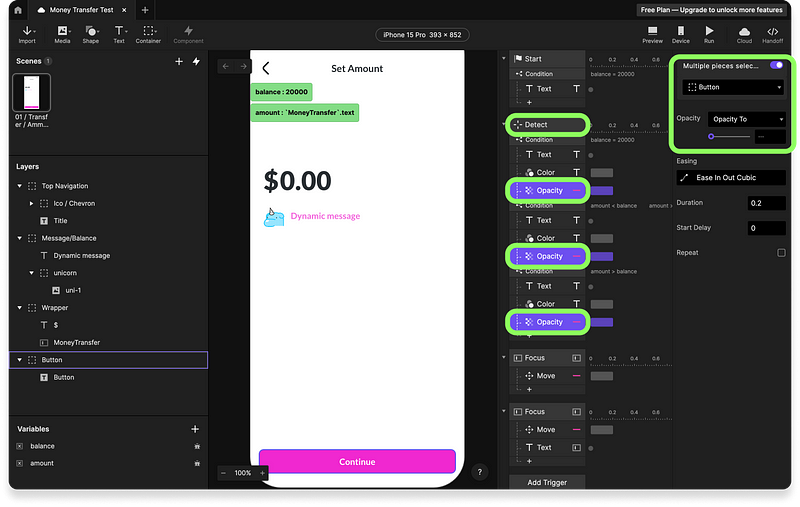
Run in the Preview window and enjoy your completed prototype…well, almost. The logic is complete. Hold on, we still need to add some squishy unicorns with LottieFiles magic 🦄🌈
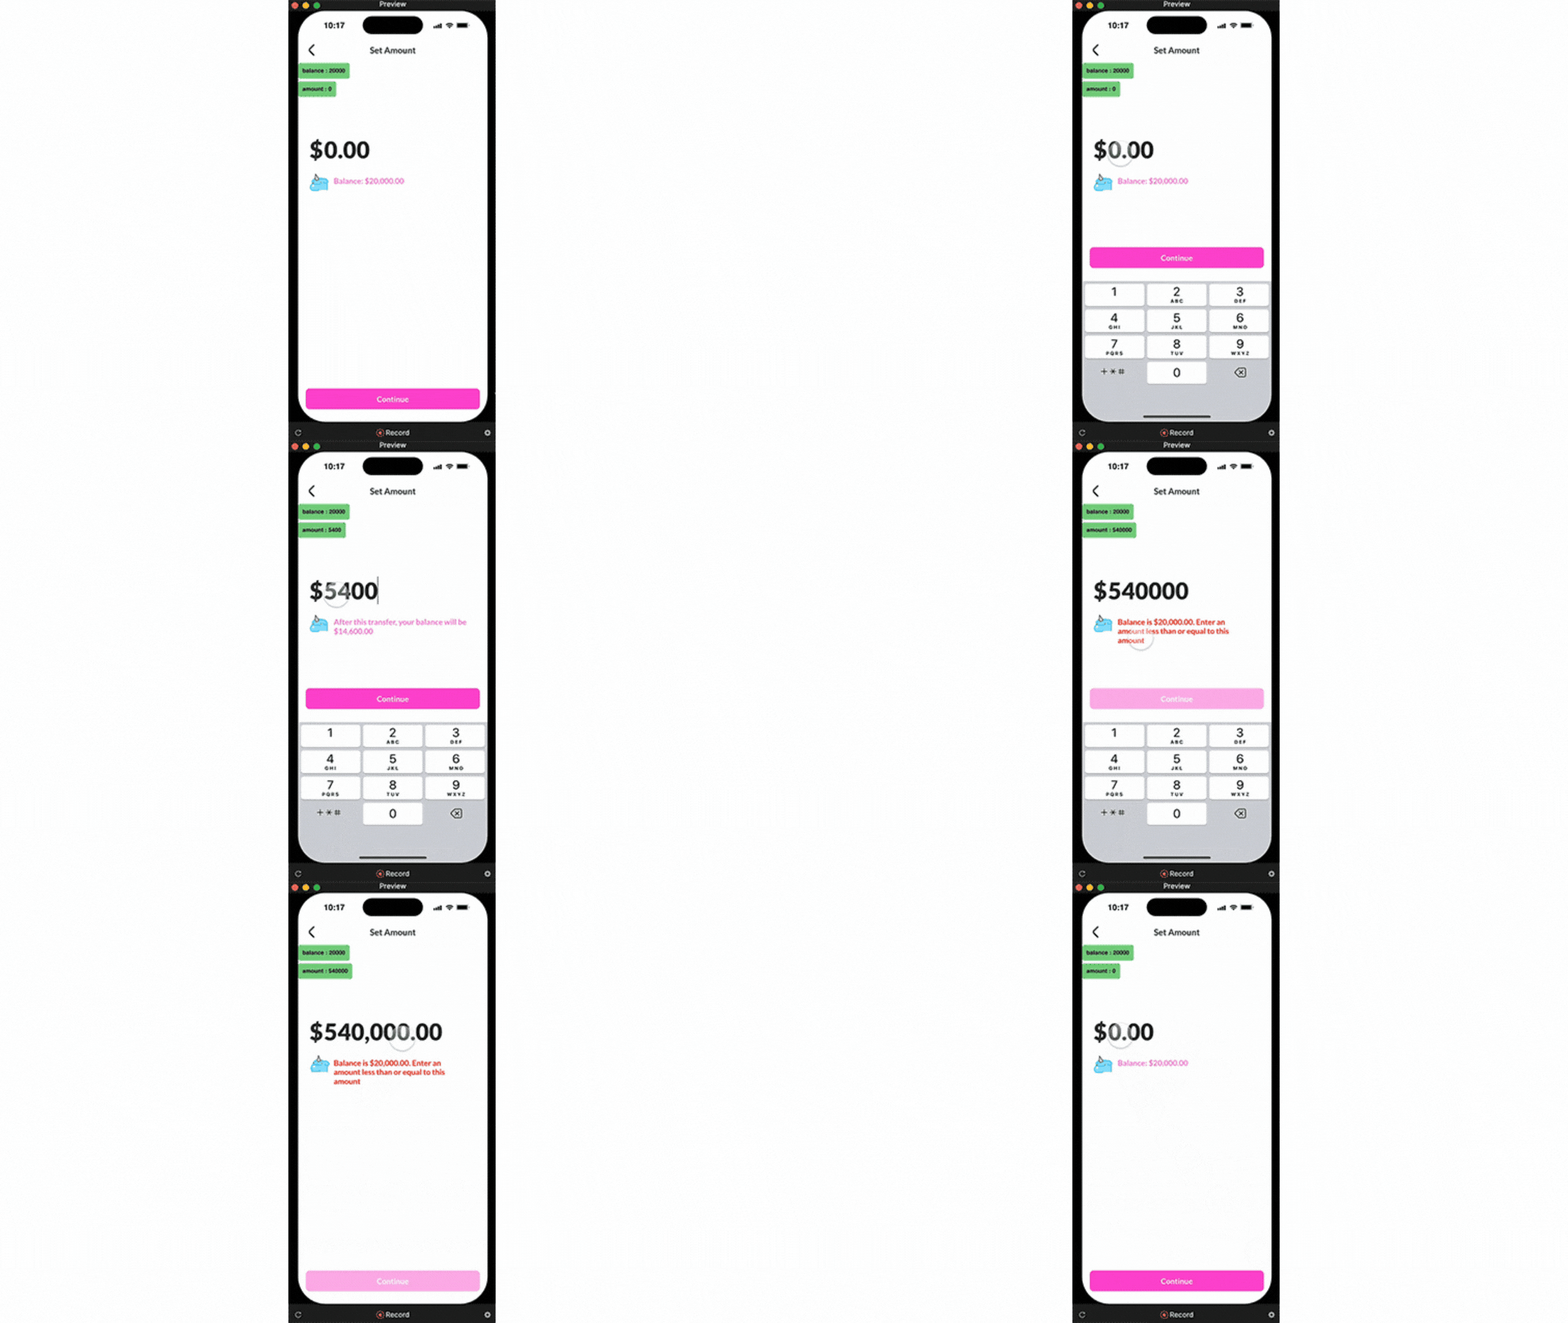.gif)
Step 3: Add Squishy animated unicorns with LottieFiles
For the animation we will use these 3 unicorns Lottie Files , which are available for free download:
- Free Surprised Unicorn Animation by Nico Del Real | LottieFiles
- Free Sad Unicorn Animation by Nico Del Real | LottieFiles
- Free Unicorn Looking Up Animation by Nico Del Real | LottieFiles
Now, let’s get started.
- Download the 3 unicorns as JSON files and drag-and-drop them inside your ProtoPie file.
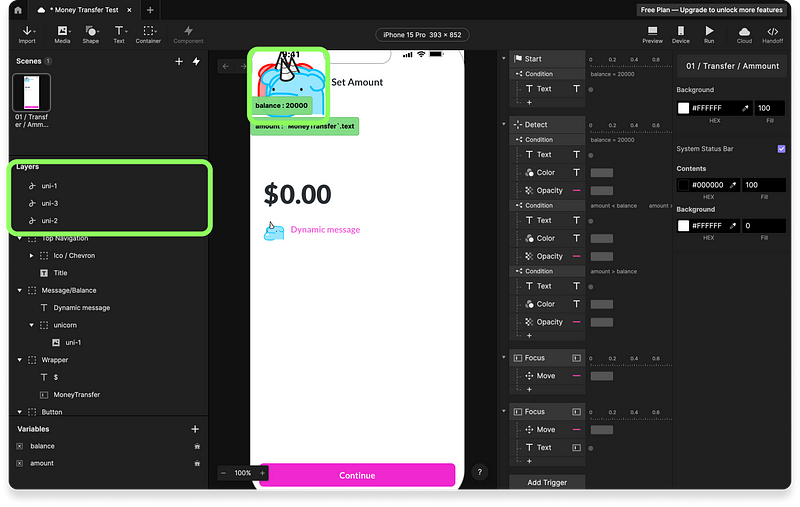
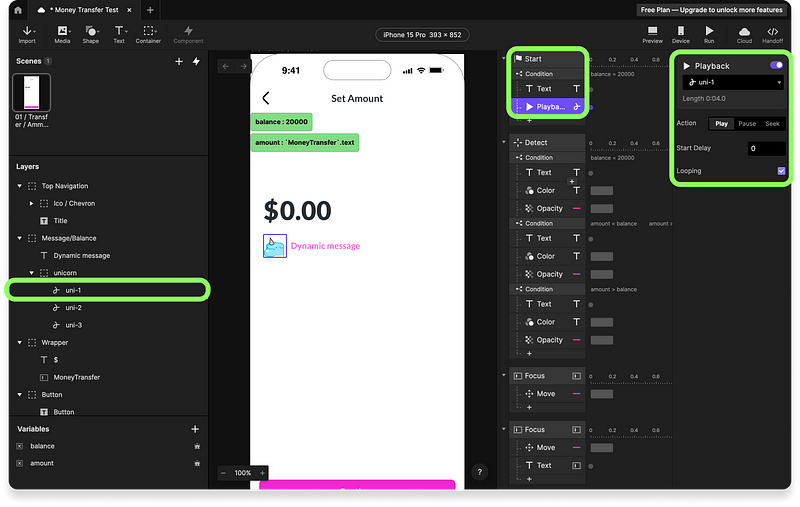
- Resize them to 42x42px and place them inside the unicorn group in your Layers panel. Erase that temporary GIF that we imported from Figma. We will do our craft with actual JSONs now.
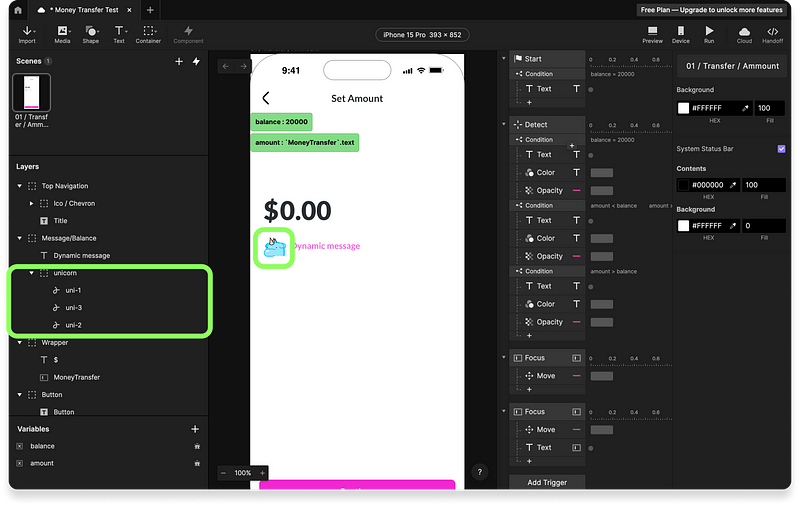
- Set the opacity to 0% for unicorns 2 and 3. Go back to the Start Trigger and add a Playback event with the play action so we can watch our first Lottie in motion. Check the looping option so the animation runs in a loop.
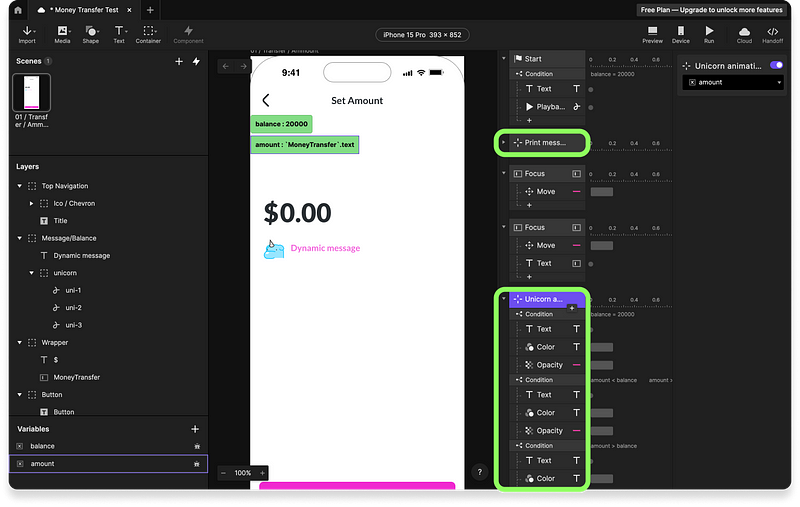
- Copy and paste the Detect Trigger. Rename the new one to Unicorn animations and the old one to Print message.
.png)
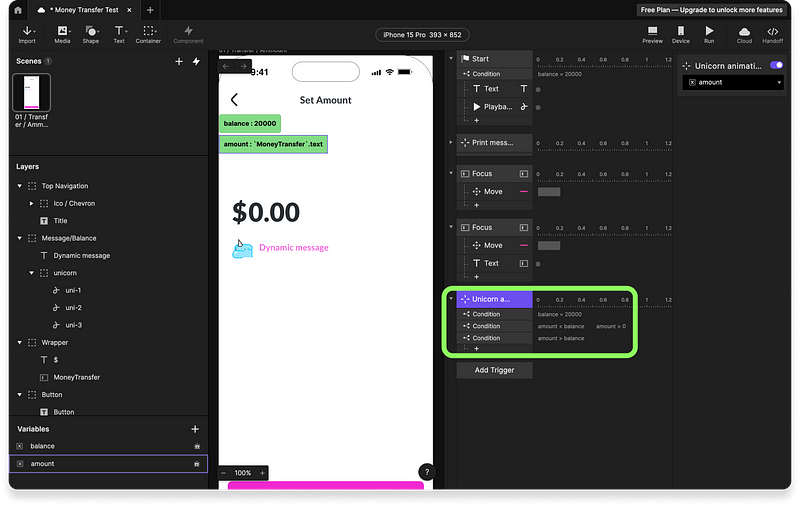
- Erase all responses of Unicorn animations Detect Trigger, we only need the trigger pointing to the amount variable and the 3 conditions.
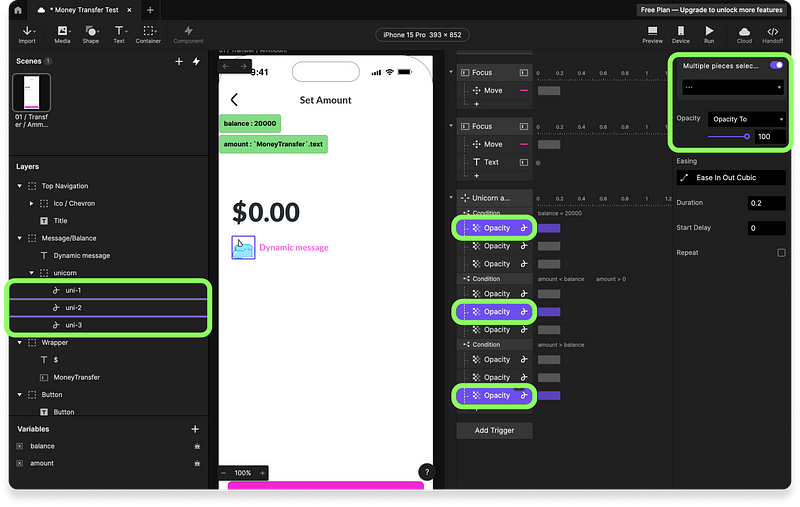
- Add 3 Opacity events on each condition. Each one pointed to one unicorn. The 1st condition will turn unicorn 1 to 100% while the others to 0%. 2nd condition will turn unicorn 3 to 100% and the others to 0%. The 3rd condition will turn unicorn 2 to 100% and the others to 0%.
.png)
- Now add 3 last Playback events. Each one is in a different condition inside our unicorn animation Detect Trigger. Loop them all.
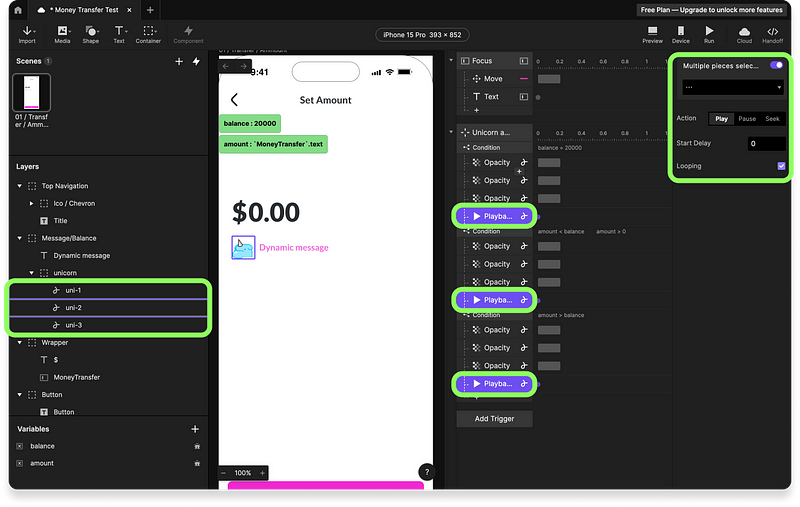
- Lastly, go to the Variables panel and turn off the debug mode of the "balance" and "amount" variables. We no longer need it. And voila! Our prototype is done 🔥.
The Final Prototype
Let’s now Preview one last time and enjoy your fully functional prototype, powered with real-time validations, dynamic error messages, advanced string formulas, customization with data, and even squishy animated unicorns.
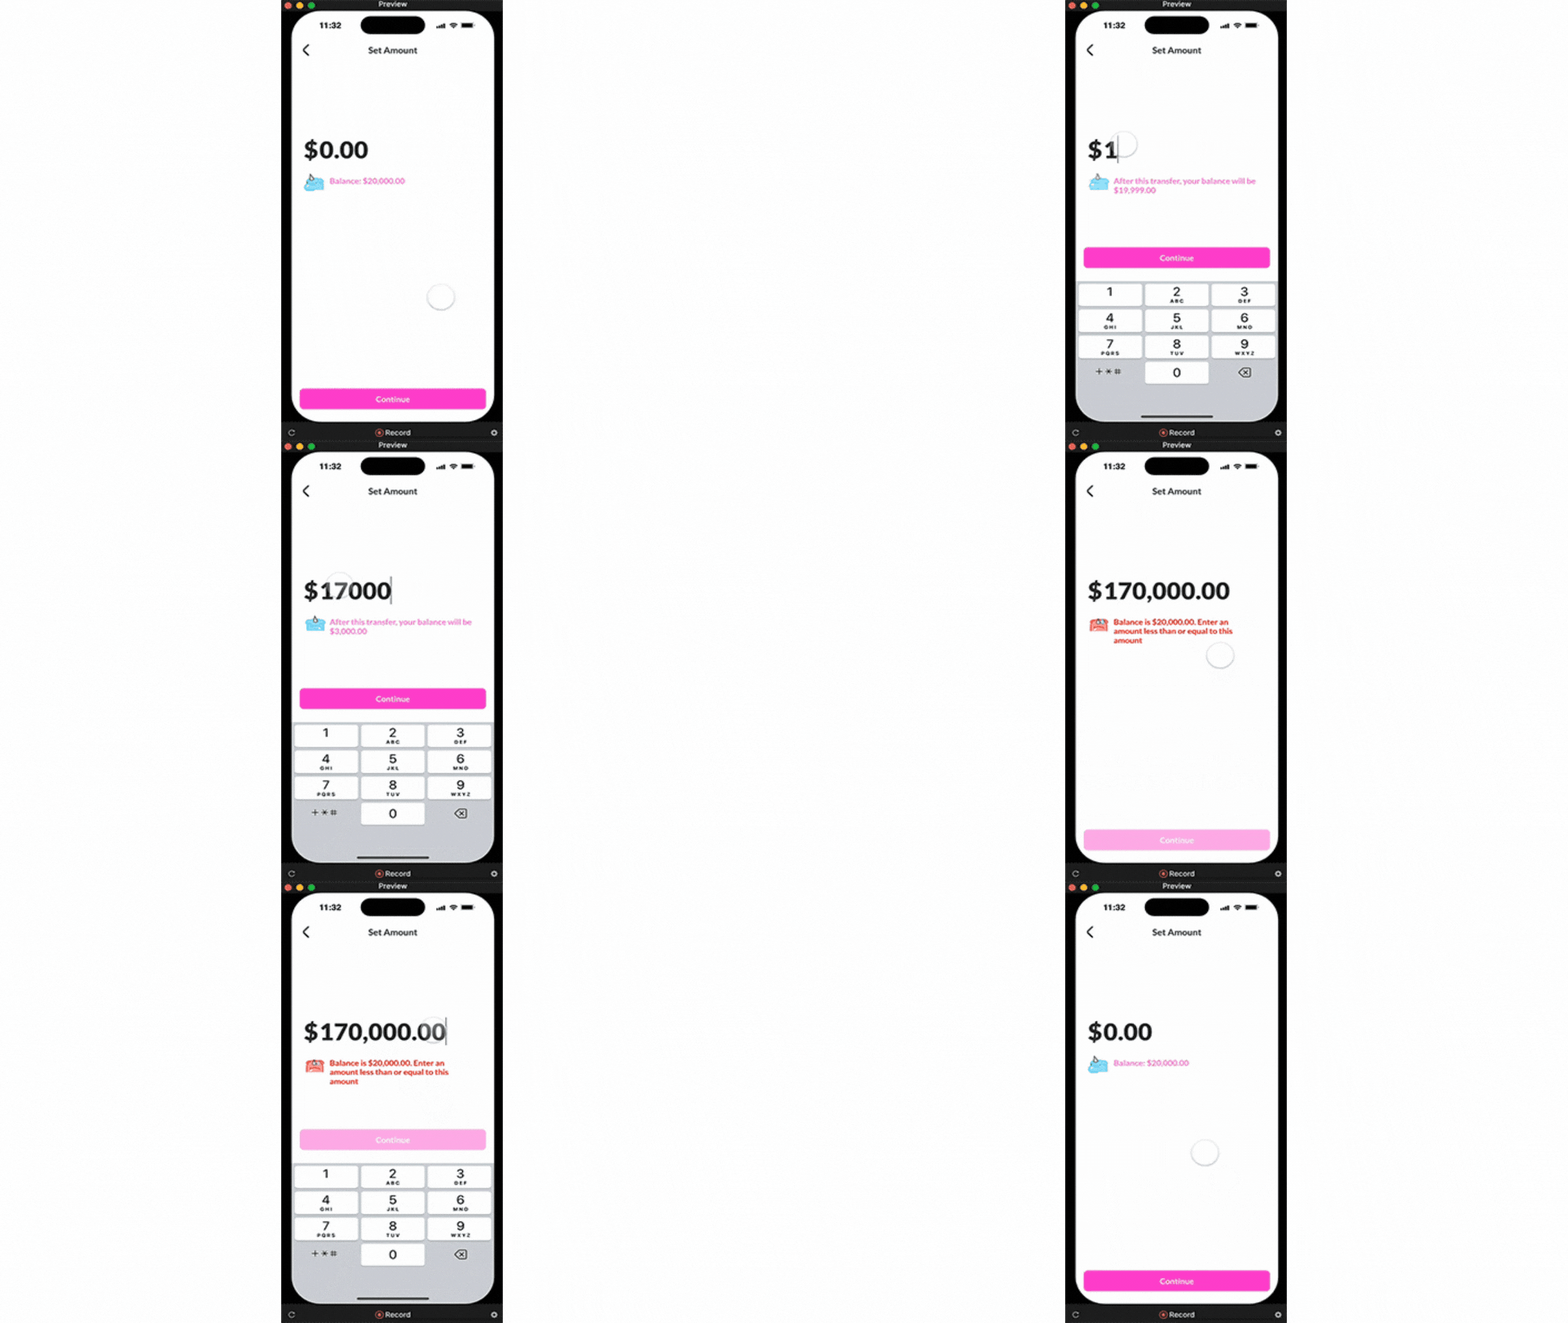.gif)
Check out the final clickable interactive prototype Here
Wrap up!
Congratulations! 🦄 You just built your first Pie with basic and advanced prototyping features. You’ve now leveled up your prototyping skills with ProtoPie, mastering advanced string formulas, dynamic feedback, and the magic of JSON-powered LottieFiles animations. By going beyond basic interactions with Figma, you’ve crafted prototypes that feel alive and responsive — perfect for delivering high-fidelity designs that bridge the gap between creativity and actual functionality.
You can explore more Tips and tricks to add more dynamics to your applications or join the ProtoPie Community to connect, learn, and grow with like-minded pioneers who share your passion for high-fidelity prototyping.
.jpg)